Key Takeaways
- In this guide you wil learn how to create email campaign
- Email campaigns are crucial for generating leads and driving sales, but manual methods waste time.
- To successfully create email campaigns, focus on setting clear goals, defining your target audience, and segmenting your list.
- Choose the type of email campaign that aligns with your goals, whether it’s newsletters, cold outreach, or promotions.
- Structure your messages for easy reading, and select suitable email campaign automation software, like TwiLead.
- Follow our simple step-by-step guide to create your first email campaign in just 10 minutes and start connecting with your audience.
Introduction
Email campaigns are a way to get more leads and close more sales.
We get it, on one hand emails are taking a lot of time and on the other hand it’s a good way to get new leads. So you want to learn how to create an email campaigns without spending too much hours on it? You are at the right place. Let see that.
If you are sending emails to your clients from your Outlook or Gmail, or using a contact list saved on Excel to update them (that is even worst) : you are making a terrible mistake.
Good news there are platforms designed to automate email sending and create email campaign with multiple emails.
That means you can create one or multiple emails at once, and schedule on automatic wherever you want them to be sent.
Most websites give you generic advice about how to create an email campaign, but they don’t explain the real step by step, so you end up watching dozens of tutorials trying to understand how you can make one.
So, we are going to spill the tea, and show you the most complete guide on the internet until now about how to create an email campaign in 10 minutes, using a highly performant and easy-to-use automation software.
Why you should create your first email campaign TODAY?
No tomorrow, no three weeks later. Start today and stop procastinating the decision of doing email campaigns: the more you wait, the more opportunities you loose.
- Email still has one of the highest ROIs of any marketing channel, you’re talking directly to people who already know you
- It’s the cheapest way to stay top of mind with your leads and customers without paying for ads every time
- You own your email list, unlike social media followers, no algorithm decides who sees your message
- It builds trust over time, a well-crafted sequence nurtures leads until they’re ready to buy
- You can automate it once and let it work for you 24/7
- It’s measurable, you know exactly who opened, clicked, and converted, so you can improve every send
All the things you should know before creating an email campaign
Before diving into the step-by-step, we are going to share with you all the basics you should know before create your first email campaign.
If you already know it, don’t hesitate to jump directly to the tutorial.
1. Set the goal of the email campaign
First thing first, if you don’t have a clear goal, it is hard to get results.
Before you write a single word, you need to know what you actually want this campaign to achieve, since your goal shapes everything else, from the subject line to the call to action.
Here you have some examples, be free to choose the one that best suits to your businness goals.
- Generate leads: Capture new sign-ups or interest from a target audience
- Nurture leads: Move prospects further down the funnel until they’re sales-ready
- Drive sales/conversions: Get a direct purchase, booking, or sign-up
- Increase brand awareness: Keep your brand top of mind even without an immediate ask
- Build trust and authority: Share expertise, case studies, or educational content
- Onboard new users/customers: Help them to get value quickly after signing up
- Promote an event or webinar: Drive registrations and attendance
- Collect feedback or reviews: Improve your offer and build social proof
2. Define your target audience
This is the step most people skip, and it’s the one that makes or breaks the whole campaign. Sending to “everyone” feels efficient, but it actually kills your results, because a message written for anyone ends up connecting with no one.
To define your ideal client, ask yourself:
- What do they do? Their job, industry, or role. This changes everything about how you talk to them.
- What problem are they facing right now? The one that’s actually keeping them up at night, not the one you assume they have.
- Where are they in their journey? Just discovering the problem, comparing solutions, or ready to buy?
- What language do they use? The exact words they’d type into Google or say out loud to a friend.
- What would make them say no? Budget, timing, trust, knowing this helps you address it before they even ask.
If you already have customers, look at your best ones, the ones who convert fast and stay long, and reverse-engineer what they have in common. If you’re starting from zero, picture one real person you’d want to convince, give them a name if it helps, and write as if you’re talking directly to them.
The narrower you get here, the stronger your campaign will be.
3. Segment your audience
As we said before, the narrower you get, the better your campaign will be.
If you don’t have a big audience yet, you can start creating your email campaign without segmentation, otherwise, don’t skip this step.
There are multiple ways to segment your list, by purchase behavior, engagement level, interests, or where someone is in their journey with you. To keep it simple, you can start with a few basic groups:
- Prospects who haven’t bought from you yet — people who gave you their email but haven’t converted, this group usually needs more nurturing before a sales pitch.
- Existing clients — people who already trust you, perfect for upsells, cross-sells, or asking for a review.
- Inactive/cold contacts — people who haven’t opened or clicked in a while, ideal for a re-engagement campaign instead of your regular content.
- Highly engaged subscribers — the ones who open and click almost every email, they’re your best candidates for early access or special offers.
- By interest or behavior — group people based on what they clicked, downloaded, or the pages they visited.
The more relevant your message feels to the person receiving it, the higher your open and click rates will be, and the less likely they are to unsubscribe.
4. Select the type of email campaigns you want to send
Not every campaign has the same job, and trying to make one email doing everything usually means it does nothing well.
Once you know your ideal client and you have a way to collect their emails, the next question is simple: what do you actually want to say to them, and why now?
The type of campaign you choose should match the goal you set earlier, whether that’s staying top of mind, opening a first conversation, or pushing someone to buy.
So, lets explore the main type of email campaigns.
Newsletters
Everybody has received a newsletter in their inbox. Newsletters are regular updates you send to people who already know you, to stay top of mind and keep the relationship warm without always asking for something.
They are aligned with brand awareness and building trust. Good to send on a regular cadence, weekly or monthly, so people know when to expect you.
They’re helpful because they keep the relationship alive without always asking for something, so when you do make an offer, it doesn’t feel out of nowhere.
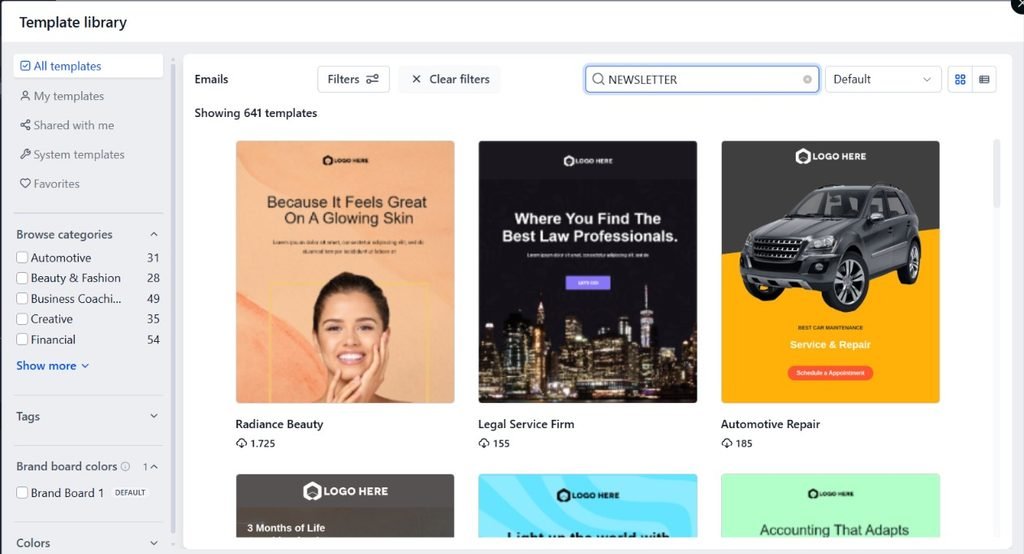
Find +600 newsletter templates using TwiLead
Cold outreach emails
Aligned with generating leads and booking calls. Good to send when you’ve just built a targeted list and haven’t had any contact with these people yet.
They’re helpful because they open the door to a conversation that wouldn’t have started on its own, especially in B2B.
Event/webinar invitations
Helpful to drive registrations and attendance. Good to send in a short sequence, first the announcement, then a reminder a few days before, then a last call the D-day.
They’re helpful because a single email is easy to forget, but a sequence keeps the event on people’s radar.
Product announcement/launch emails
This type of campaigns are aligned with increasing adoption and awareness. It sounds pretty obvious, but when do you have to send it? Send the first one right when the feature or product goes live, and once more to those who didn’t open the first one.
They’re pretty helpful when your existing list is already warm, they just need to know something new exists.
Promotional campaigns
Do you have an audience? Let your audience know your new promotion! Use it to boost sales and conversions when you have a real offer, a discount, a bundle, or a deadline. They’re helpful because urgency and a clear call to action push people who were already considering it to finally act.
5. Structure your message for easy reading
Nobody reads emails word by word anymore, they scan. If your message looks like a wall of text, it doesn’t matter how good the offer is, most people will just close it.
Keep your paragraphs short, two or three lines max, use bullet points when you’re listing anything, and leave enough white space so the email feels easy on the eyes, not overwhelming.
One clear message per email works better than trying to fit five ideas into one send, and your call to action should stand out, not get buried at the bottom after three paragraphs nobody finished reading.
6. Choose an email campaign automation software
In this case, we used TwiLead to create the email campaign of the tutorial; if you don’t have an account you can create it for free here.
And yes, you can create email campaigns and use all the features without restrictions during the 14 day free trial.
7. Create a simple way to collect leads
This step is important if you want to sustain your email marketing strategy: you will constantly need to feed your email list.
There are multiple ways to collect leads on automatic, could be using a lead magnet, a chatbot, a landing page, or a simple form to insert on your website and social networks.
You just need something that allows you to get the emails of your ideal client.
Platforms like TwiLead allow you to create multiple lead collection strategies in an easy way, without needing a developer or a separate tool for each one.
You can build a landing page in minutes, set up a chatbot that qualifies visitors and captures their email automatically, or embed a simple form directly on your site, all connected to the same CRM, so every lead lands in one place instead of scattered across different apps.
And once you have that system in place, you can duplicate and adapt it for every new offer or campaign, without starting from scratch each time.
Want to know how you could improve your business?
Our team is available for a free consultation.
The Ultimate Guide to Learn How to Create Email Campaigns, Step-by-Step
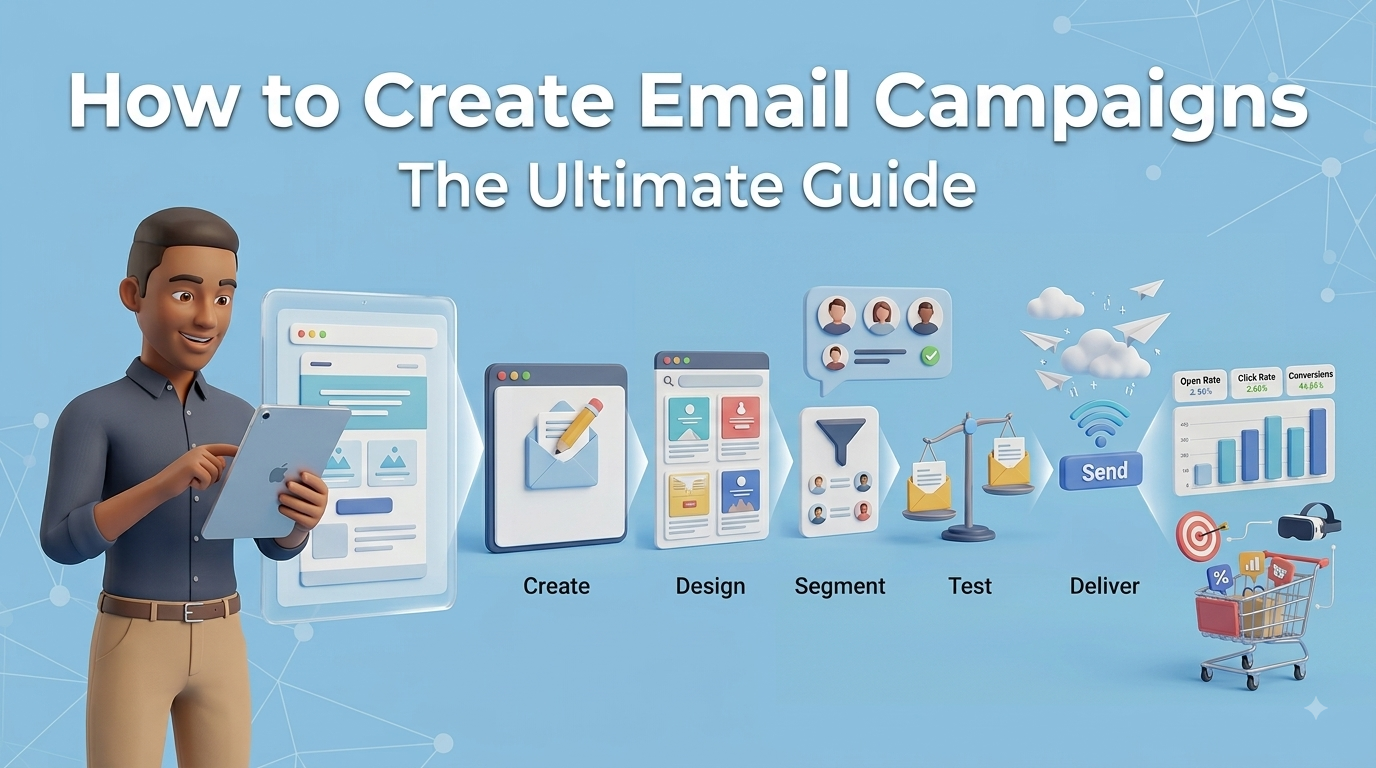
Now, the exciting part… Create your first email campaign! Follow this step-by-step guide and you will have the campaign ready in minutes.
1. Navigate to Email Marketing and create an email
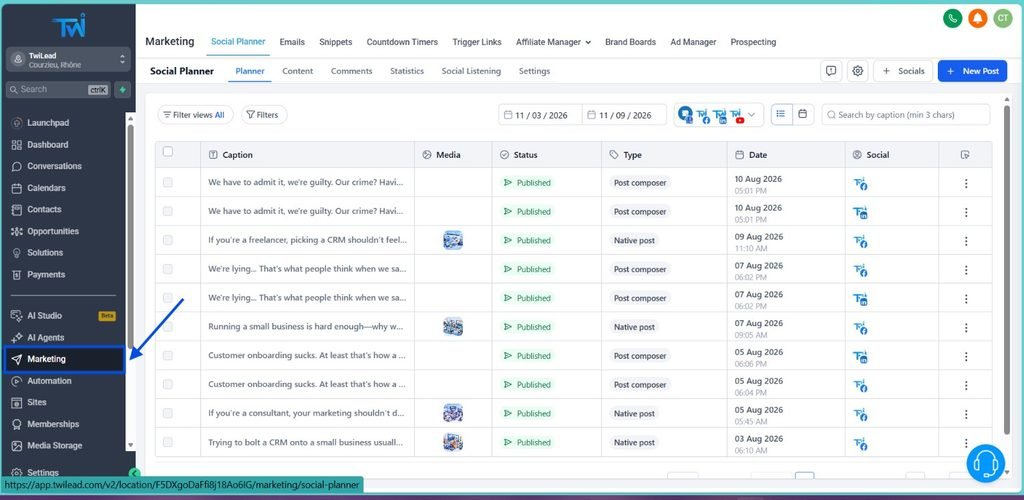
Left sidebar → click Marketing
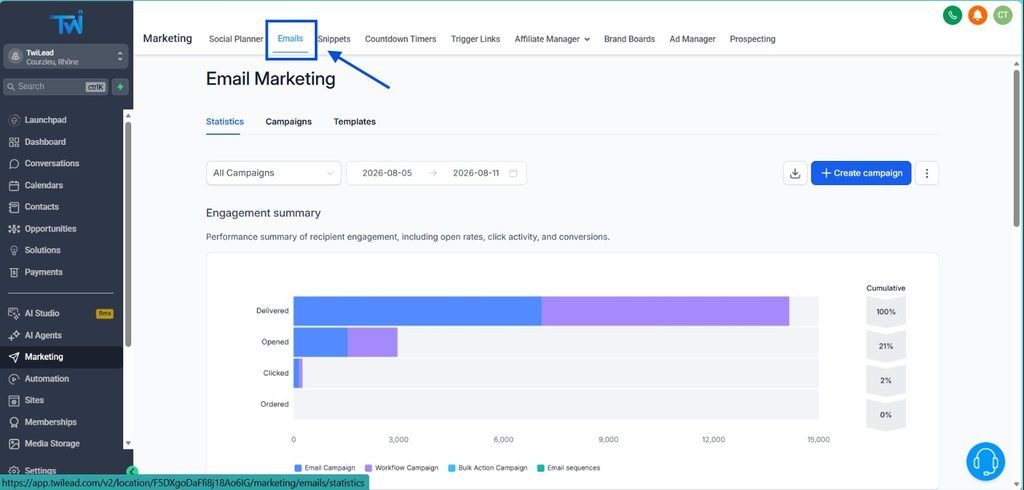
Superior bar→ Click Emails.
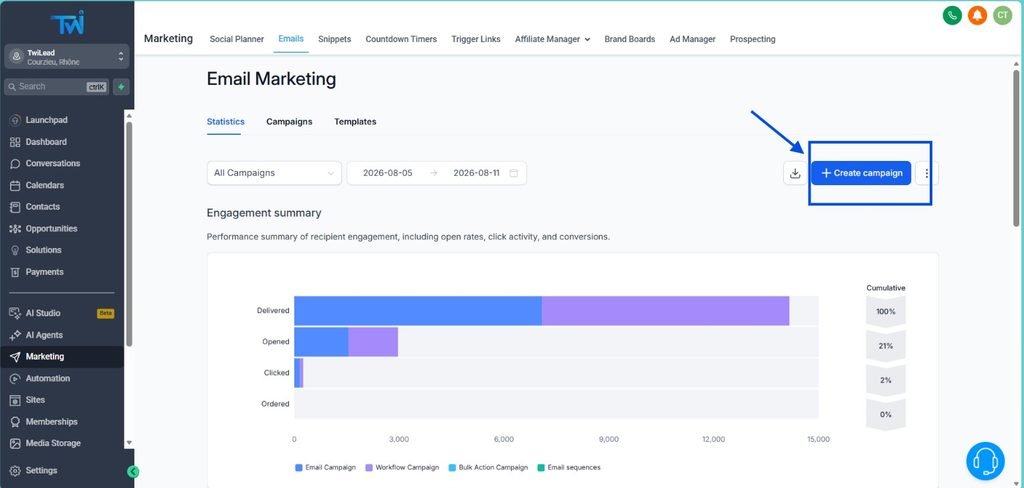
Then go hit the “Create Campaign” button
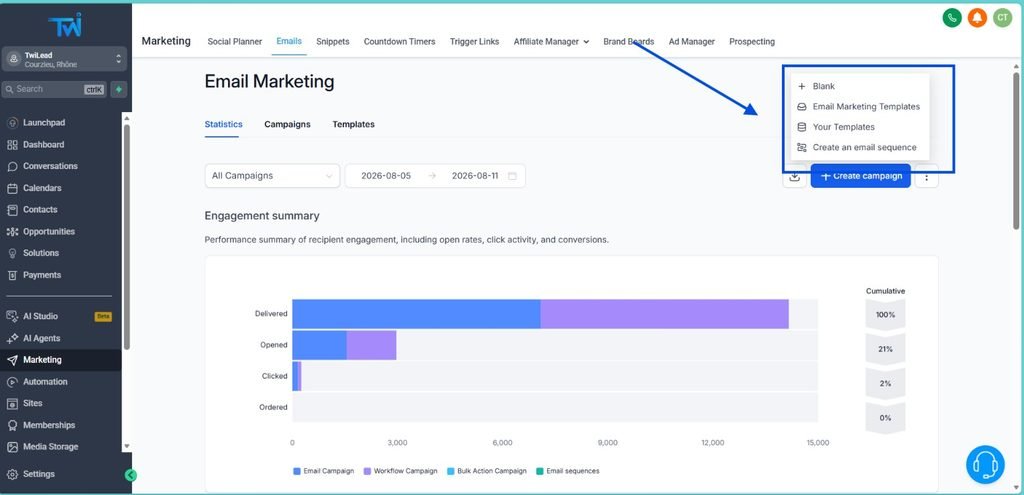
A menu is going to deploy. You will find multiple options, including starting from scratch using the “Blank” option, or choosing between +100 prebuilt templates conceived to help you optimize your click rates. If you feel creative, don’t hesitate to go with the blank option, but if you prefer to save time and focus on a design already created, choose a template.
For this example, we are going to continue with a template.
.
2. Edit your template
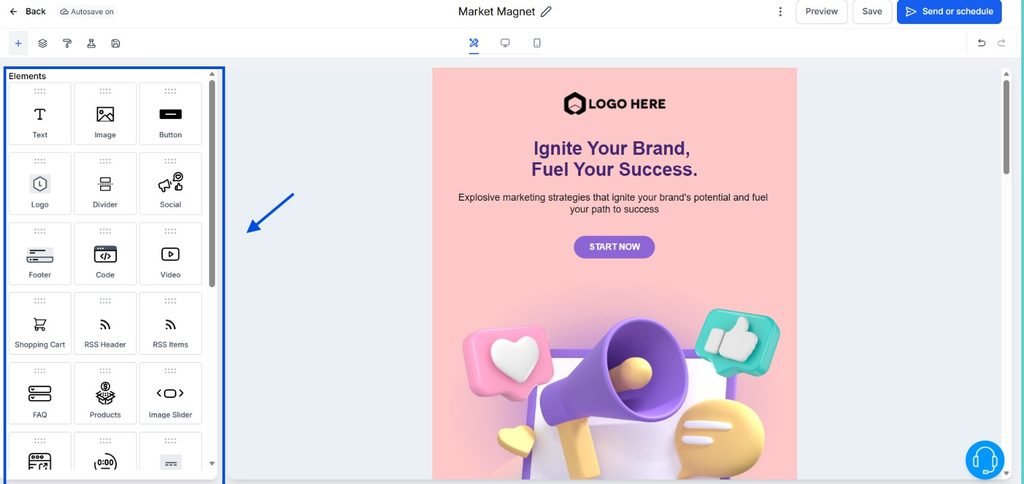
As you can see, the template is ready to use, you just need to change the text, adapt the colors to your brand colors, and customize any element as you want.
On the left sidebar, you’ll find all the elements available to add: images, text, shopping cart, videos, and more.
To add an element to your mail body, just drag and drop any of the elements available on the left side bar. Anytime you want to modify an element already added, click the element and a menu with all the options will appear. Let´s see some examples!
3. Customize your text style
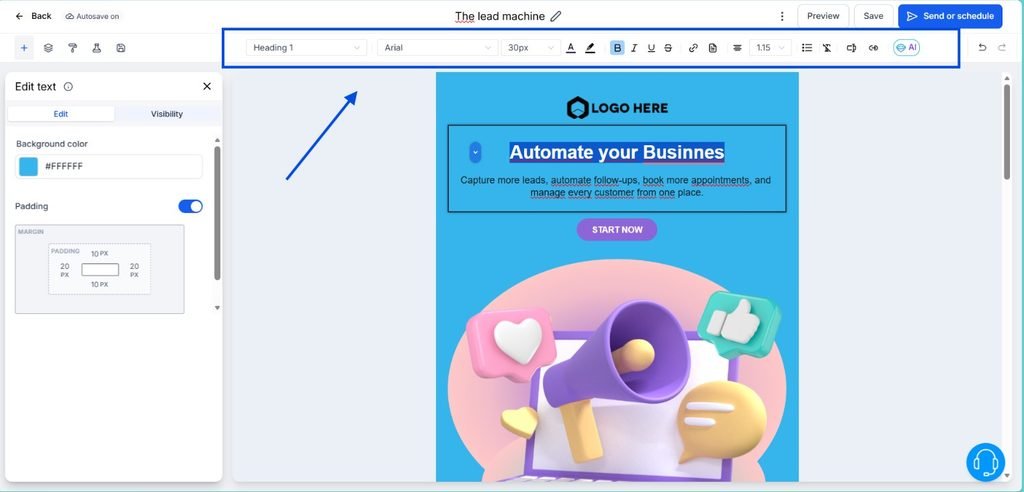
To change the style of text and headings, click the element you want to modify, then at the superior part you are going to see a toolbar with options like fonts, add a URL, custom values and more.
4. Change and add images
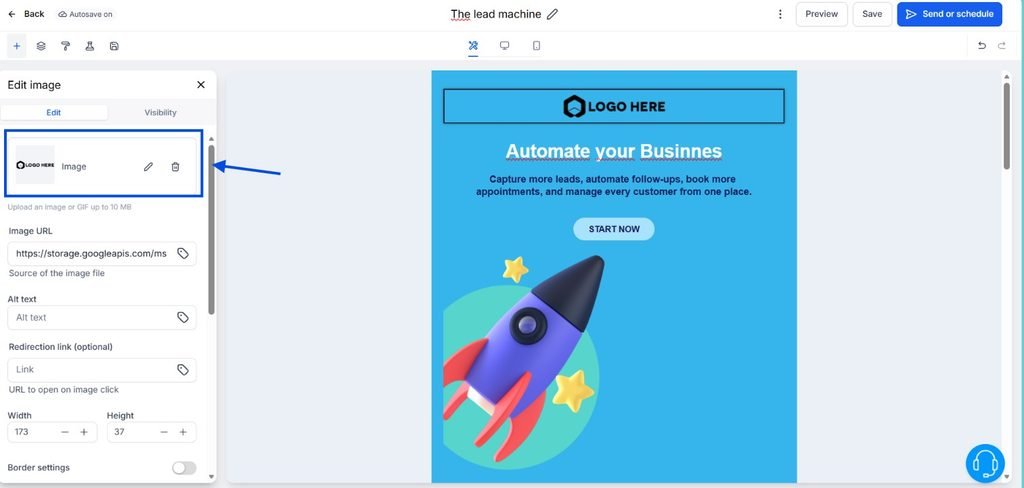
To import images, you need to click on the image and go to the leftside menu.
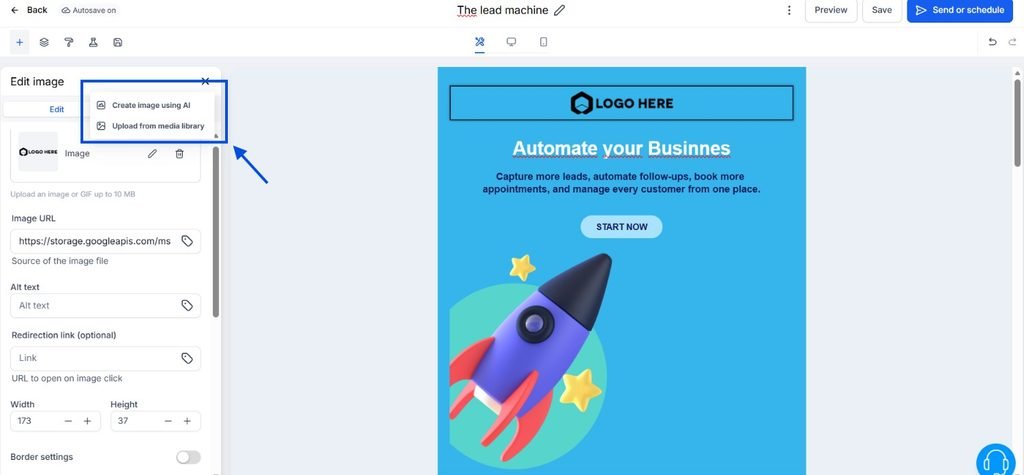
Click the small pencil. A new menu will appear. You can create an image using AI or import an existing image.
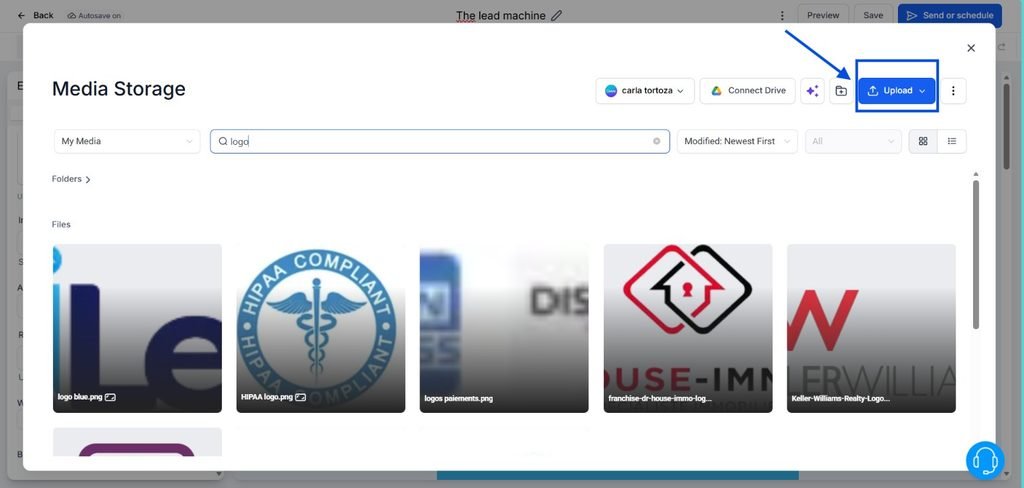
Click the Upload button, and upload the images from your device.
.
5. Save elements
If you are planning to do email campaigns frequently, you will need to use the same elements to keep your brand visual consistent.
Instead of customize the elements each time, you can save them to use them later.
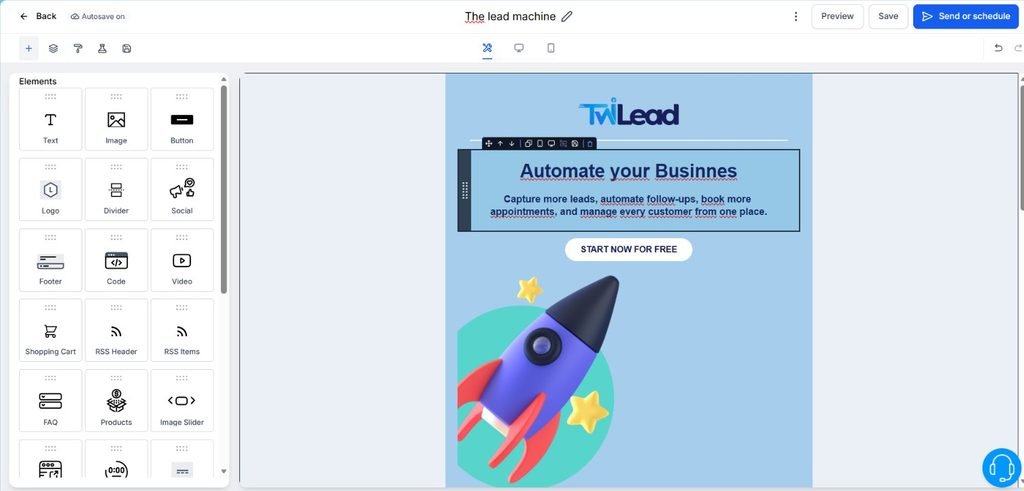
Hover your mouse over the item you want to edit without clicking on it
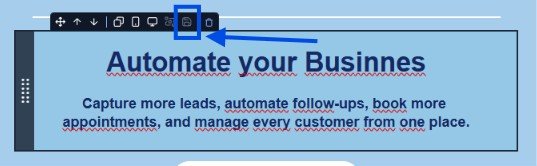
A small toolbar will appear. Click the save icon. That’s it!
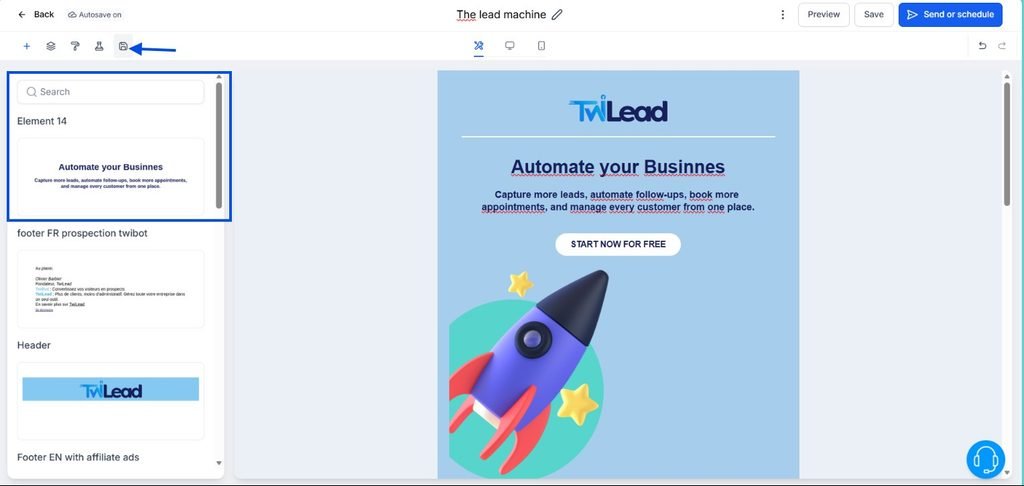
Your saved element will appear in the Saved section, accessible from the toolbar in the top-left corner.
You can see the final result clicking on Preview.
6. Schedule the sending
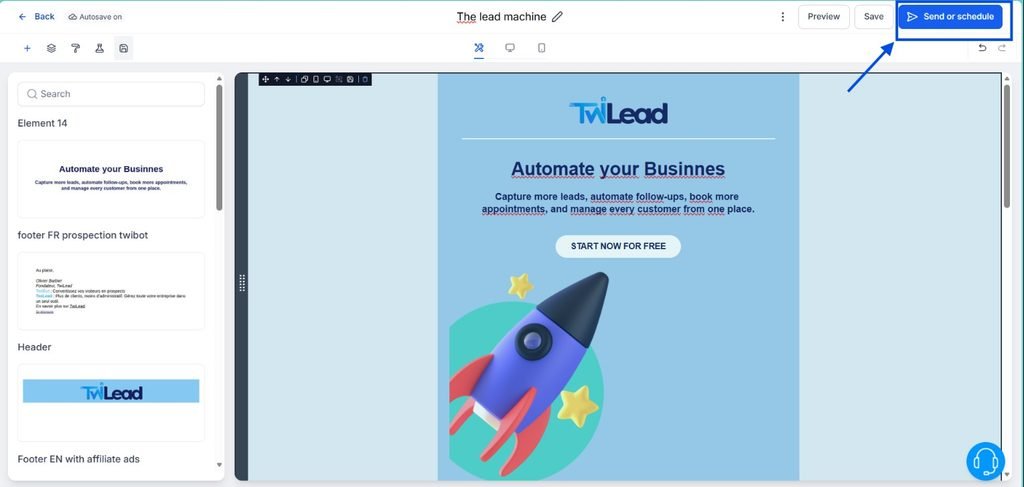
Clik the Send or Schedule button
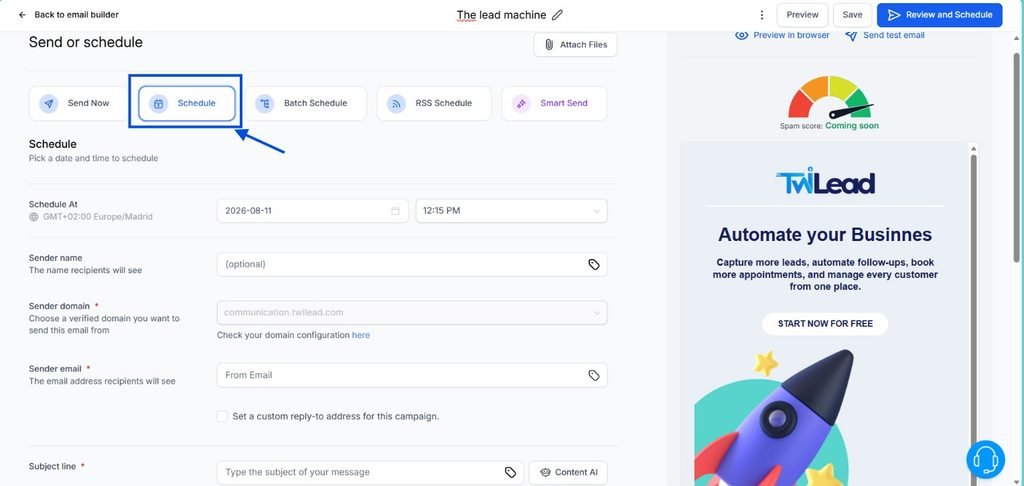
Click on Schedule.
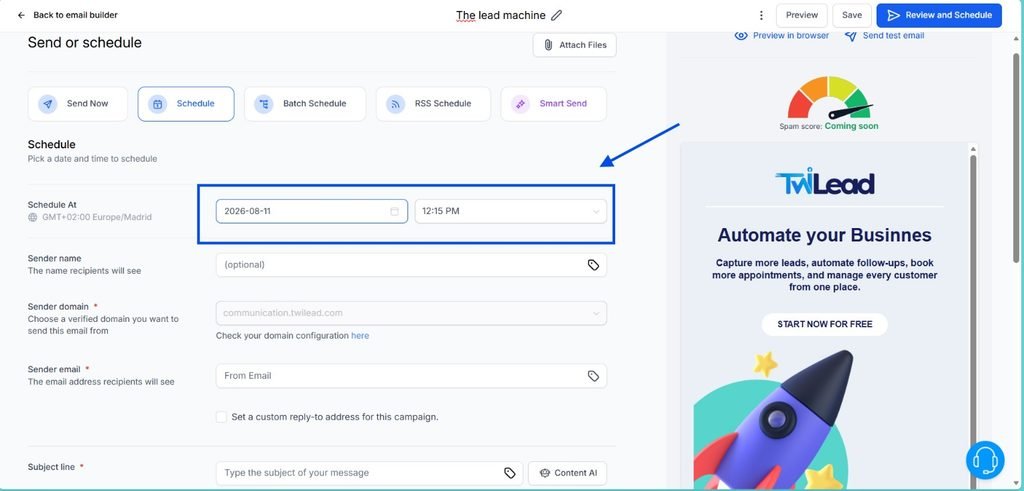
Choose the date and hour you want the email to be sent.
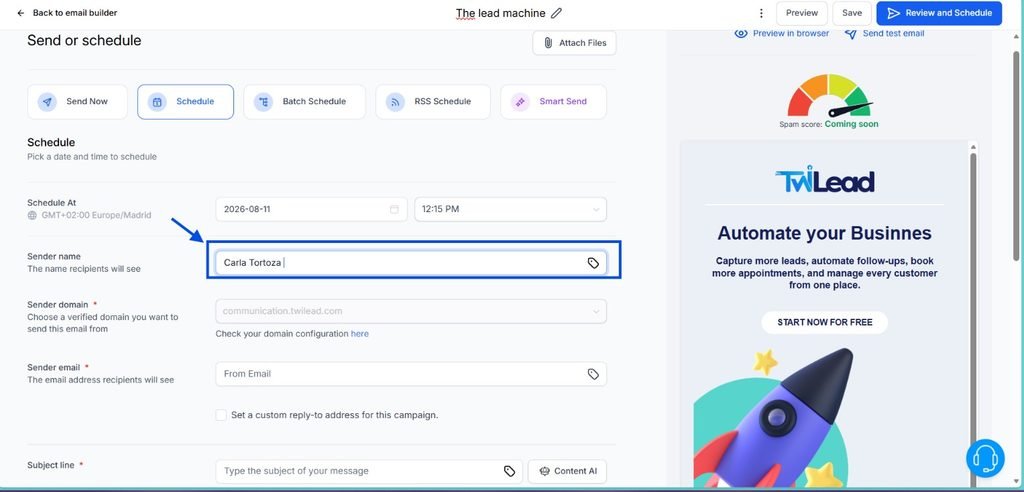
Add a sender name, could be your name or the name of your businnes
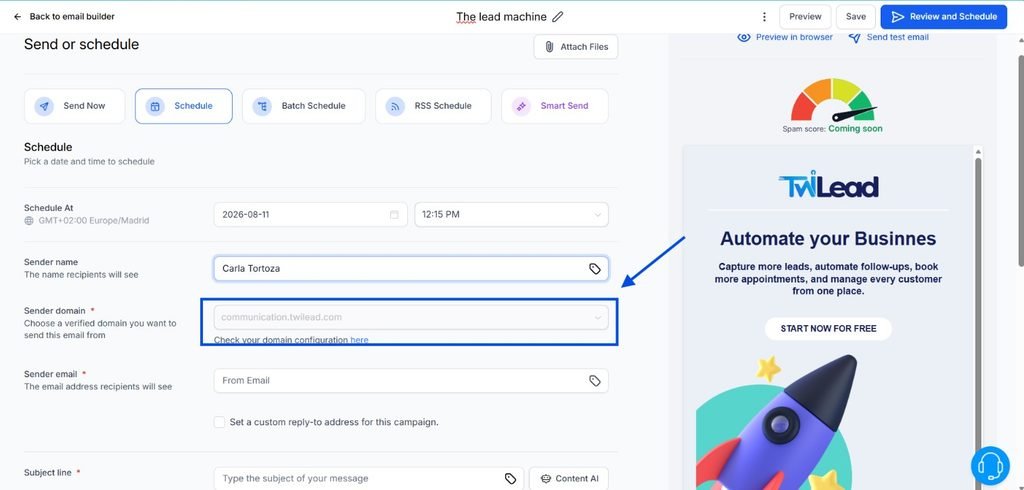
Add a verified domain, if you don´t have one yet, you can get one at TwiLead.
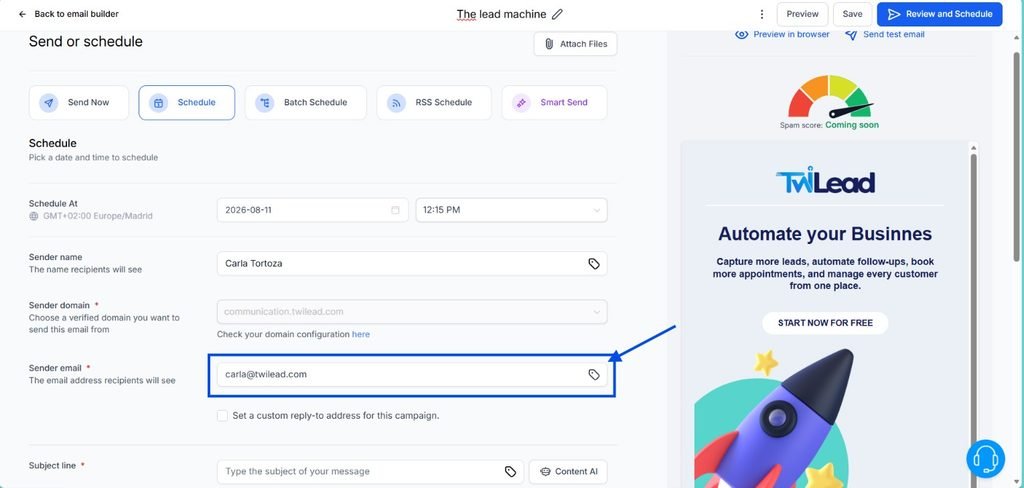
Add the sender email, be sure of having a professional email addres to avoid to be signaled as Spam.
.
Know the difference: Your sender domain is your website domain (e.g.
twilead.com), this is what needs to be verified and authenticated with your provider, and it’s what determines whether your emails land in the inbox or in spam.Your sender email is the actual address people see, like
carla@twilead.com, it sits on top of your domain, and you can create as many as you need (sales@, hello@, support@) once the domain itself is verified. If your domain isn’t verified, no sender email will save your deliverability.
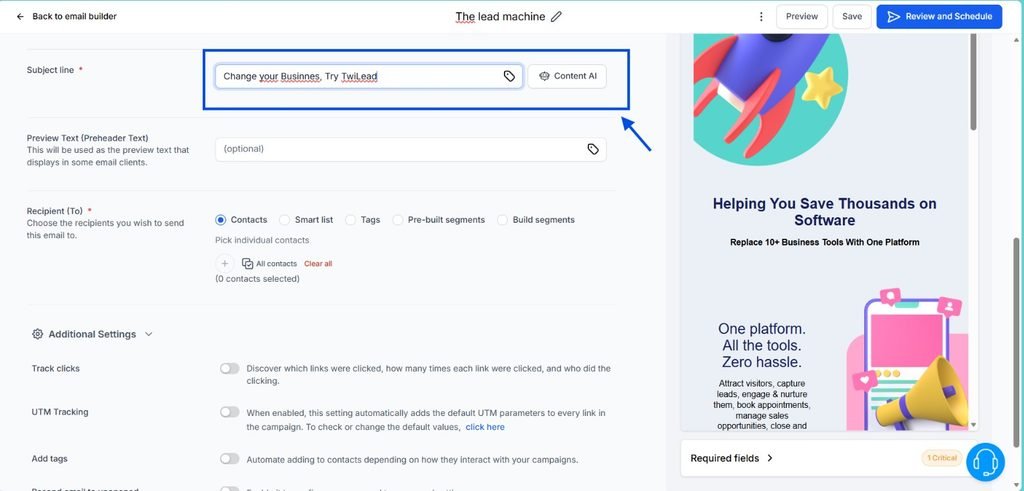
Scroll a little and you will find a new section. Here you can add your subject line and Preview text. The subject line is the most important part, it is going to be the first line your audience is going to see, so it has to be attractive enough to grab their attention.
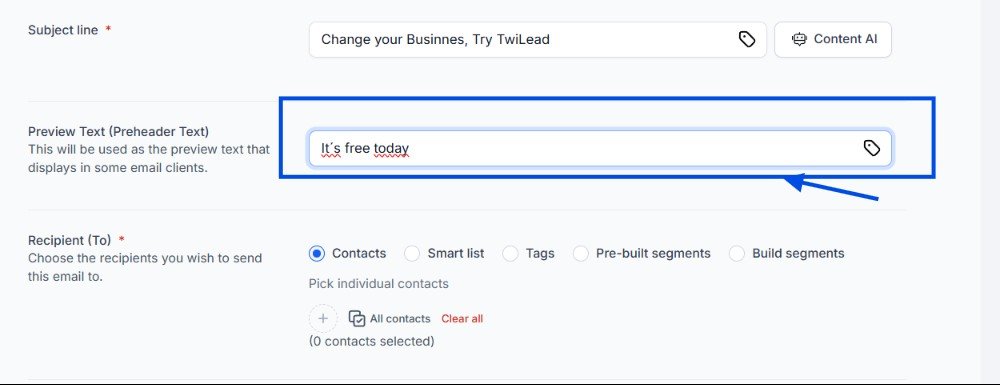
Preview text is basically the little teaser that shows up right after your subject line in someone’s inbox, think of it as your email’s wingman. While the subject line grabs attention, the preview text is what seals the deal and gets the actual click.
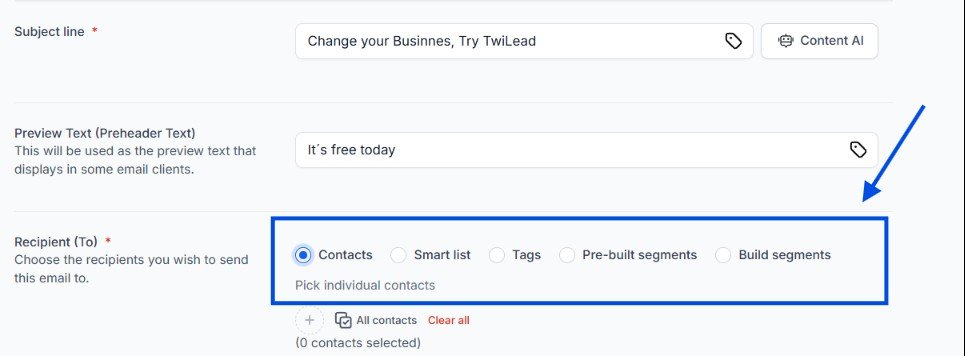
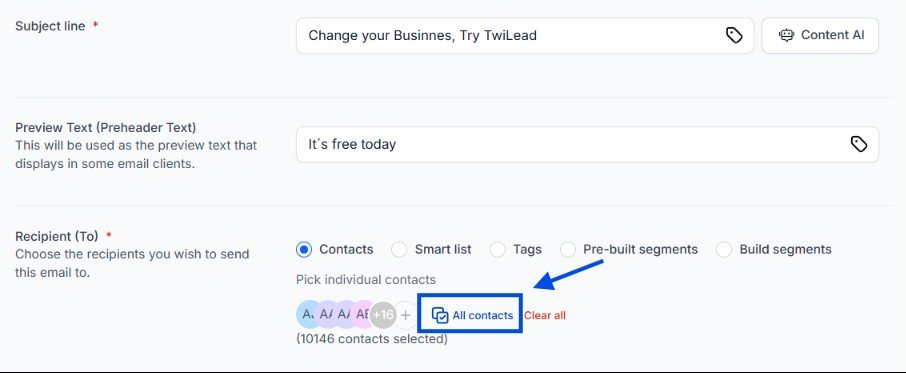
Select the list of contacs you want to send the email. If you want to send it to all your Contacts, choose the All contacts option. But if you want to segment, you will need to create smart lists or tags.
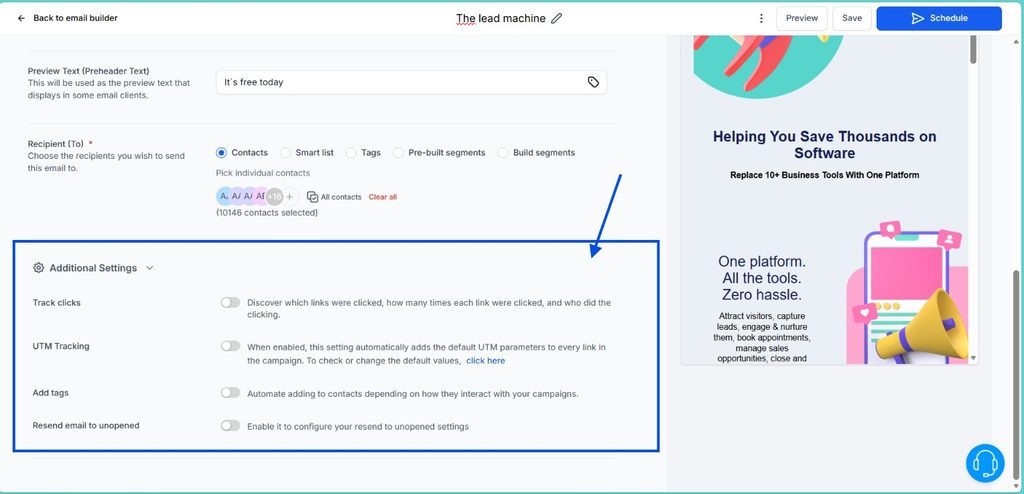
And last, but not least: if you want to do advanced tracking you will find all the options at the end.
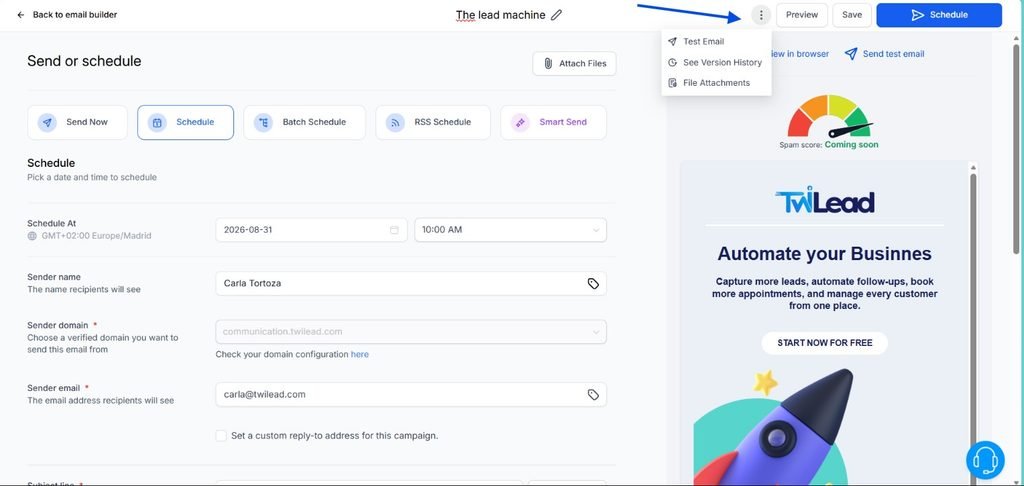
Before scheduling the email, we recommend you to send a test email. This way you’ll make sure the email is exactly how you want it to be. To do so click on the 3 small points at the right and “test email”.
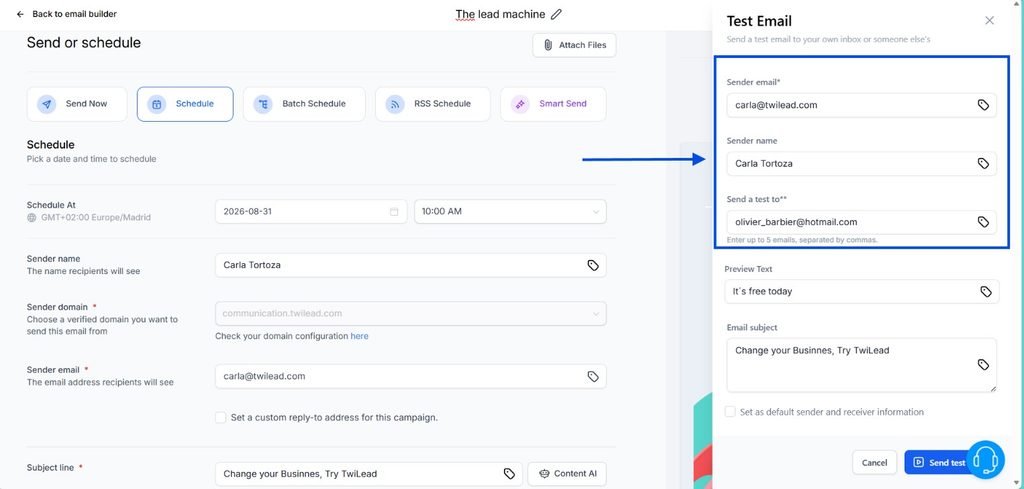
Complete the fields, including the email address you want to use to receive the test email and click the “Send test” button. That’s all! You should receive an email to the inbox of the email used.
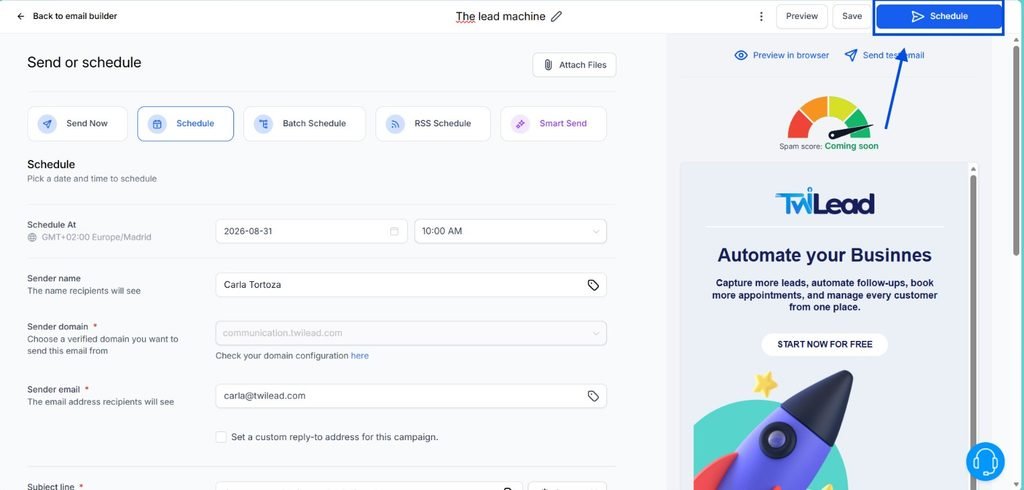
If everything is ok with the email, now you can schedule it: click the Schedule blue button to do so.
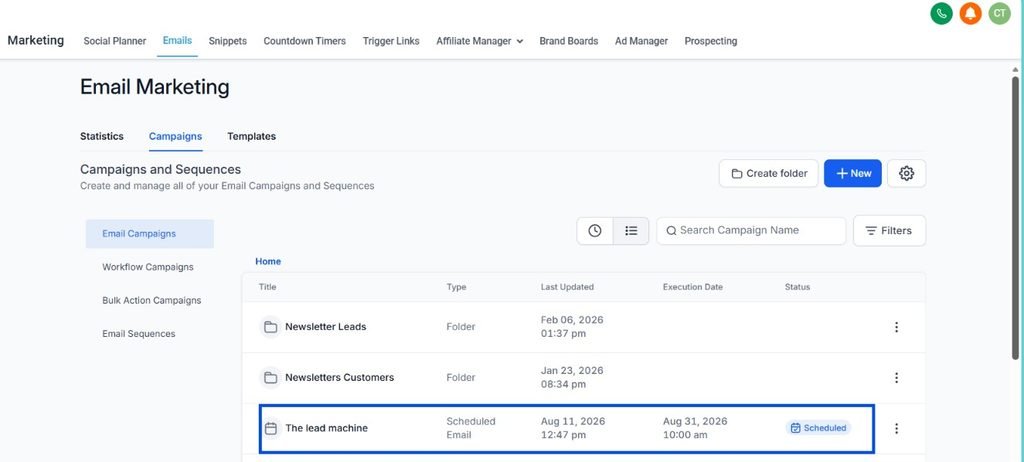
You will be automatically redirected to the Email Marketing section where you will find your scheduled email campaign. That means everything is ready and now you can chill or go to any other business task.
Ready to launch your first campaign?
Now you know how to create email campaigns, from defining your ideal client to writing a subject line people actually want to open. No more watching random tutorials or guessing what step comes next, you have the real step by step right here.
The only thing left to do is put it into practice. Create your first email campaign for free with TwiLead, you’ll have access to all the features during your 14 day free trial, no restrictions, no credit card headaches.
So what are you waiting for? Your first campaign could be live in the next 10 minutes.
You’ve created your first automated email campaign, what’s next?
Congratulations, you just automated your first email campaign! But here’s the truth: sending one automated email is just the first brick.
Your goal is to get more leads and close more sales. Sending your first campaign is the first step: to actually increase conversions and boost sales, you need to master the entire email marketing strategy around it, not just the send button.
You need to repeat, to analyze reactions, and to nurture leads the campaign has created.
A few questions worth asking yourself right now:
- How do you know your emails are actually working? Which metrics matter (opens, clicks, replies, conversions), and how often should you be checking them?
- How many emails should you be sending? Too few and you’re invisible, too many and you end up in the trash before they’re even read.
- What happens to the information your emails collect? Every open, click, and reply is data, but it’s only useful if your sales team knows how to act on it.
This is where most people stop too early. They automate one email, see a small win, and move on, without realizing the real gain comes from connecting the dots: follow-ups that trigger automatically, opportunities that get organized the moment someone shows interest, and a sales team that knows exactly who to contact and when.
To help you master the full strategy like a pro, we created a series of guides you can explore:
- Automate your follow-ups, so no warm lead goes cold without you lifting a finger
- Combine sales pipelines with automation, to automatically qualify and organize interested leads for your sales team
- Segment your contacts to send the right message to the right person at the right time
- Track your email analytics to know exactly what’s working and what to fix
- Connect your calendar to your emails so interested leads can book a call directly, no back-and-forth
Each guide dives deeper into one piece of the puzzle, so you can build a system that doesn’t just send emails, but actually turns them into conversations, and conversions.
.
Want to know how you could improve your business?
Our team is available for a free consultation.