Key Takeaways
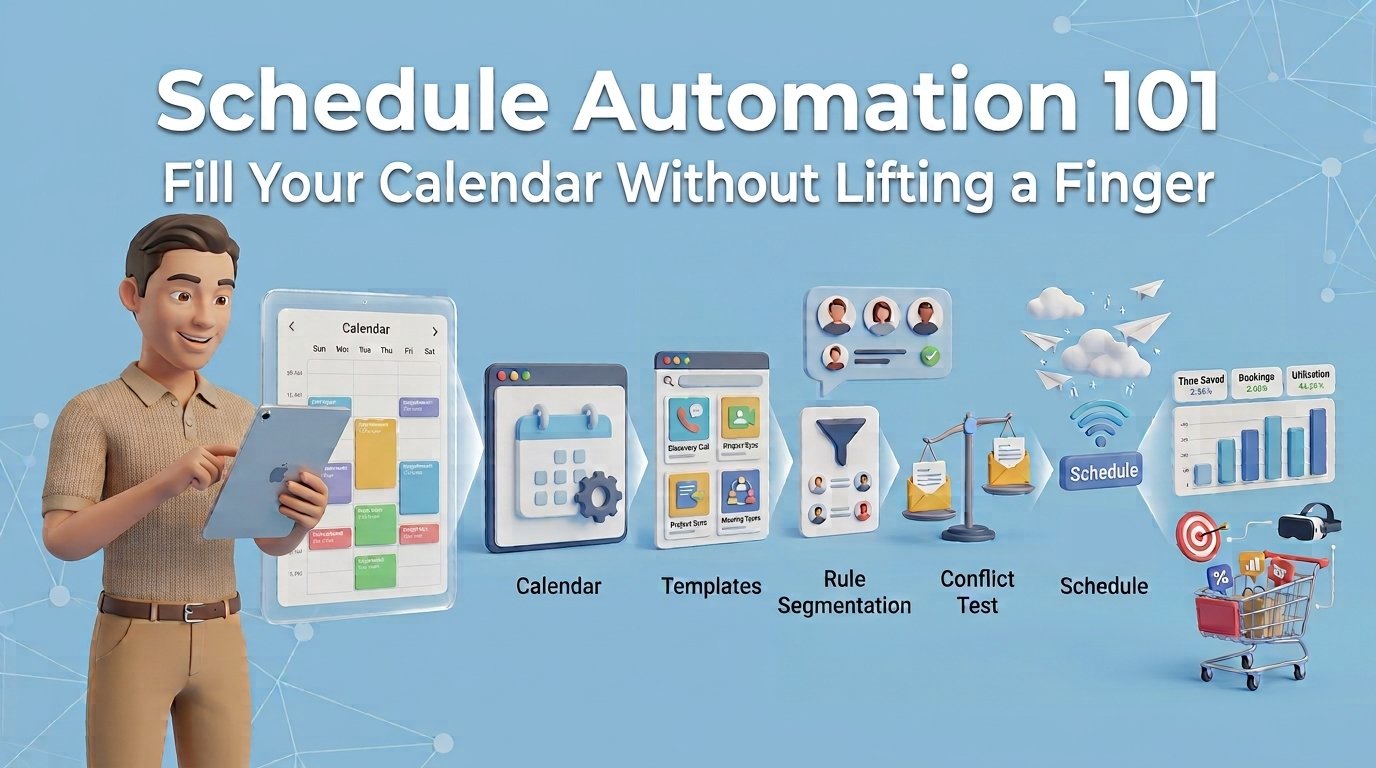
- Manual scheduling wastes time and loses deals, so adopting Schedule Automation can streamline processes.
- With Schedule Automation, clients choose their own time slots, eliminating back-and-forth emails and reducing no-shows.
- This guide teaches you to set up an advanced Schedule Automation system using TwiLead, integrating everything from reminders to invoicing.
- Key steps include defining scheduling purposes, setting availability rules, and automating follow-ups and confirmations.
- Regularly check your booking analytics to optimize your Schedule Automation system and avoid common pitfalls like forgetting buffer times or time zone settings.
Introduction
Manually collecting appointments isn’t just outdated, it’s costing you deals every single week. Schedule Automation can solve this problem and streamline your process.
Your prospects don’t want to wait for your reply to find a time that works, they want to pick a slot themselves, in 5 minutes or less, and move on with their day.
But this guide isn’t about slapping together a basic booking link like you’d get from Calendly.
We’re going to show you how to build an entire schedule automation system, one that fills your calendar automatically, boosts your conversions, triggers follow-ups on its own, and moves leads through your pipeline without anyone touching a spreadsheet.
In a nutshell, by the end of this guide you’ll have a booking system that would make any workflow specialist charging $2000 for something less complete a little jealous.
What schedule automation actually means
Schedule automation means saying goodbye to the endless “does Tuesday at 3pm work for you?” email chain.
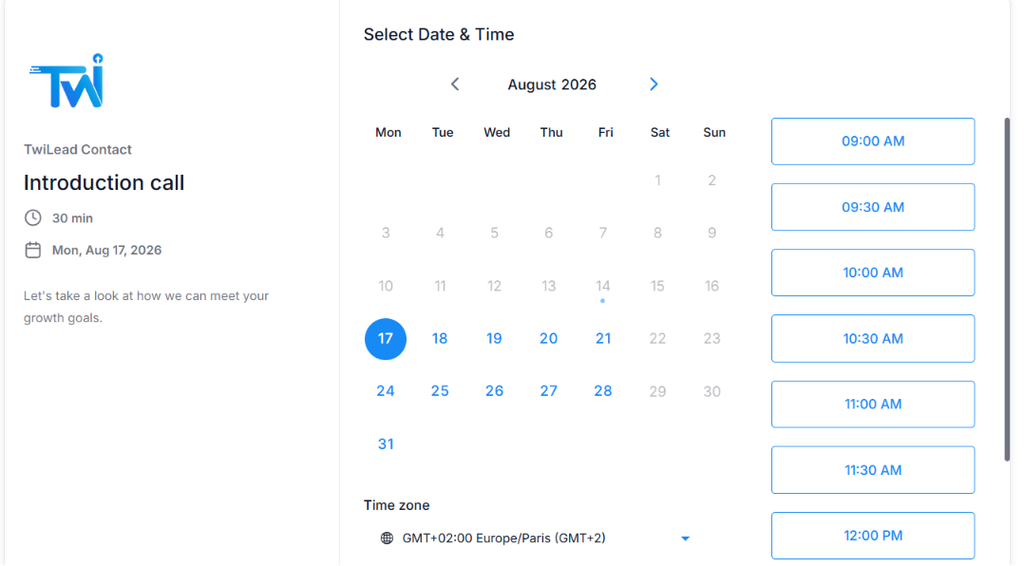
Instead of manually checking your calendar and going back and forth until you find a time that works, your prospects or clients see your real availability and book directly, no waiting on your reply, no double bookings, no time zone confusion.
What you’ll walk away with.
By the end of this guide, you’ll have schedule automation system fully up and running, a system that fills your calendar automatically, sends invoices and charge clients automatically, keeps your team’s schedule organized, confirms every booking on its own, and sends reminders so people actually show up and you stop wasting your time for last minute cancellations.
To create this schedule automation guide, we used TwiLead; if you don’t have an account you can create it for free here. And yes, you can set up your schedule automation and use all the features without restrictions during the 14 day free trial.
Why manual scheduling is costing you money, and you don’t even realize it
You send an email offering three time slots. They reply saying none of those work.
You send three more. They’re in a different time zone, so what you thought was 2pm is actually 8am for them.
By the time you finally lock in a date, you’ve burned five emails and a good chunk of your day on a single 30-minute call, time you could have spent closing another deal.
And that’s before the no-show, because nothing was ever confirmed or reminded automatically, so that slot you fought to book just went to waste.
What schedule automation fixes
Every minute lost to back-and-forth is a minute not spent selling, and every no-show is a slot you could have filled with someone ready to buy. Schedule automation removes that cost entirely.
Your real-time availability is visible instantly, so there’s no guessing and no double booking. Time zones are detected and adjusted automatically, so you stop losing deals because of confusion nobody even notices is happening.
And once a slot is booked, confirmations and reminders go out on their own, protecting your calendar from empty slots and protecting your revenue in the process.
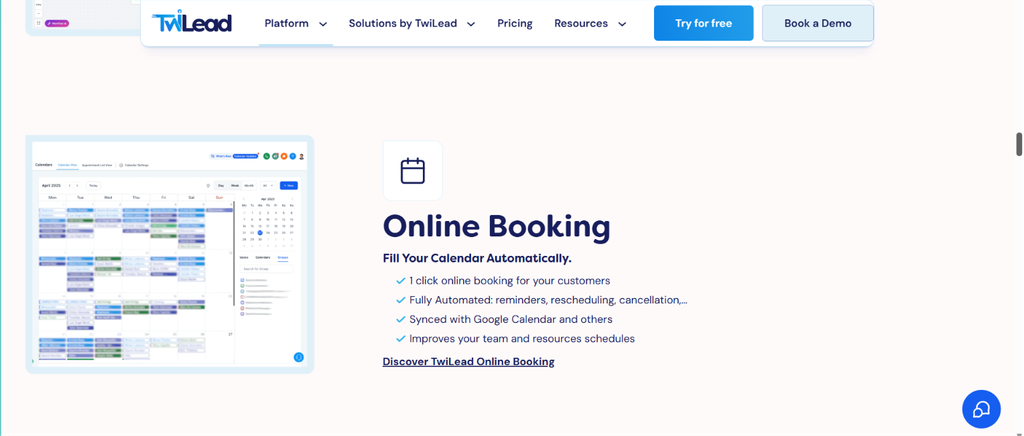
TwiLead is more than an online calendar, is a complete software for automate your businnes
Before you set up your automated scheduling
To create an automated scheduling system, it’s important to have clarity about a few things. Otherwise, the process could get confusing and demand more time than needed.
1. Define what you’re scheduling for (sales calls, consultations, demos, appointments)
Not every booking serves the same purpose, so before you touch any settings, get clear on what you’re actually scheduling.
A sales call needs different prep than a consultation, a demo needs different timing than a quick appointment.
Knowing this upfront shapes everything else, how long the slot should be, what questions to ask when someone books, and what happens on your end to prepare for it.
2. Set your availability rules (working hours, buffer time, days off)
Your calendar should protect your time, so decide your real working hours, and stick to them, don’t let bookings creep into your evenings just because the system allows it.
Add buffer time between calls so you’re not jumping from one conversation straight into the next with zero breathing room, and block off your days off so nobody accidentally books you on a day you’re not working.
This isn’t just a technical setting, it’s you deciding how you actually want to work.
3. Decide what happens before and after a booking (confirmation, reminders, follow-up)
A booking isn’t the finish line, it’s the start of a sequence. What confirmation does the person get the moment they book?
What reminder goes out before the call, so you’re not stuck with a no-show?
And just as important, what happens after, a follow-up email, a next step, a form to fill out. Map this out now, because this is exactly what you’ll automate in the steps ahead.
Want to know how you could improve your business?
Our team is available for a free consultation.
Set up your automated scheduling, step-by-step
Now that you have clear ideas on what you’re scheduling for, your availability rules, and what should happen before and after a booking, it’s time to actually build it.
Below, we’re going to walk you through a complete tutorial, step by step, showing you exactly how to set up an entire automated scheduling system, not just a basic calendar link, but one connected to reminders, pipelines, and follow-ups working together.
By the end, you won’t just have a calendar people can book into, you’ll have a system that fills your slots on its own, keeps your team organized, cuts down no-shows, and moves every booked lead straight into your sales process, all without you touching a spreadsheet or sending a single manual reminder.
Step 1: Choose the automation software
Not all scheduling tools are built the same, some only let you book a slot, while others let you build a full system around that booking.
This is exactly why we’re using TwiLead for this guide, it’s not just a calendar, it’s connected to your CRM, your pipelines, and your automations, so every booking triggers everything else you’ve mapped out, without needing to stitch together three different tools.
Step 2: Create your booking calendar
Using TwiLead, you can create your booking calendar in just 5 minutes. It’s important to have all the previous information ready (what you’re scheduling for, your availability rules, and what happens before and after a booking), since that makes the actual setup so much easier and faster.
We have an entire guide, including a video explanation, on how to create a booking calendar, you can check it out here.
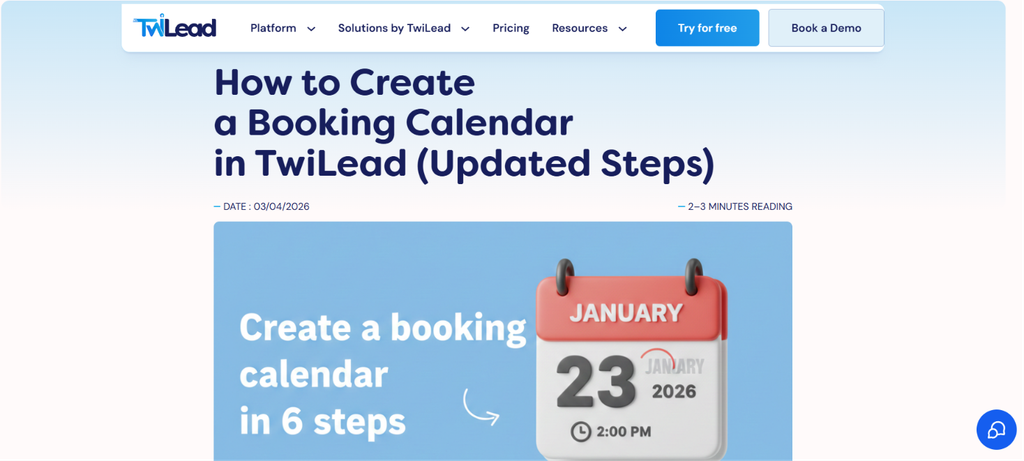
It takes just 5 minutes to create your first booking calendar at TwiLead
Step 3: Automating what happens after someone books
This is where schedule automation stops being just a calendar and starts becoming a real system.
The booking itself is only the trigger, what happens next is what actually saves you time and protects your revenue. This is the key to support your business growth.
Auto-send confirmation and reminder sequences
After set-up your booking calendar, you can automate the confirmation and reminder sequences, even if you never have created an automation in your life.
Auto-send confirmations
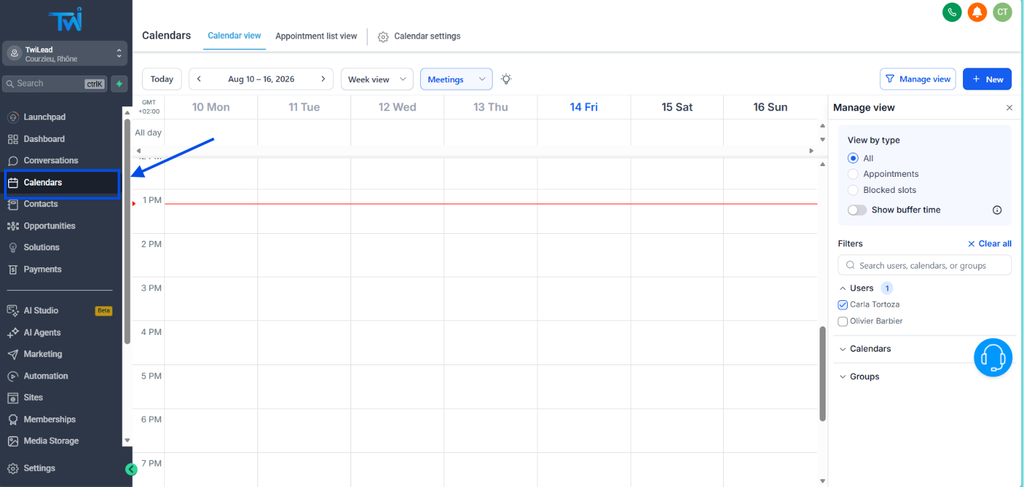
Go to the Calendar section.
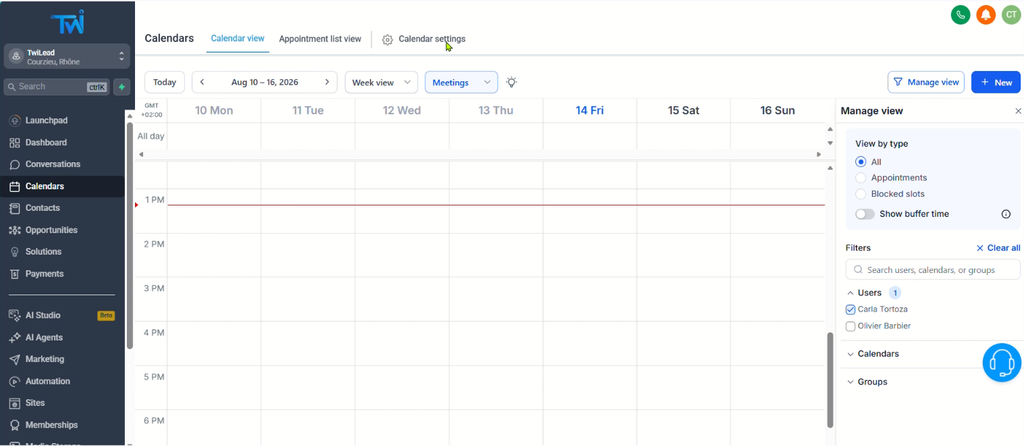
Click on calendar settings
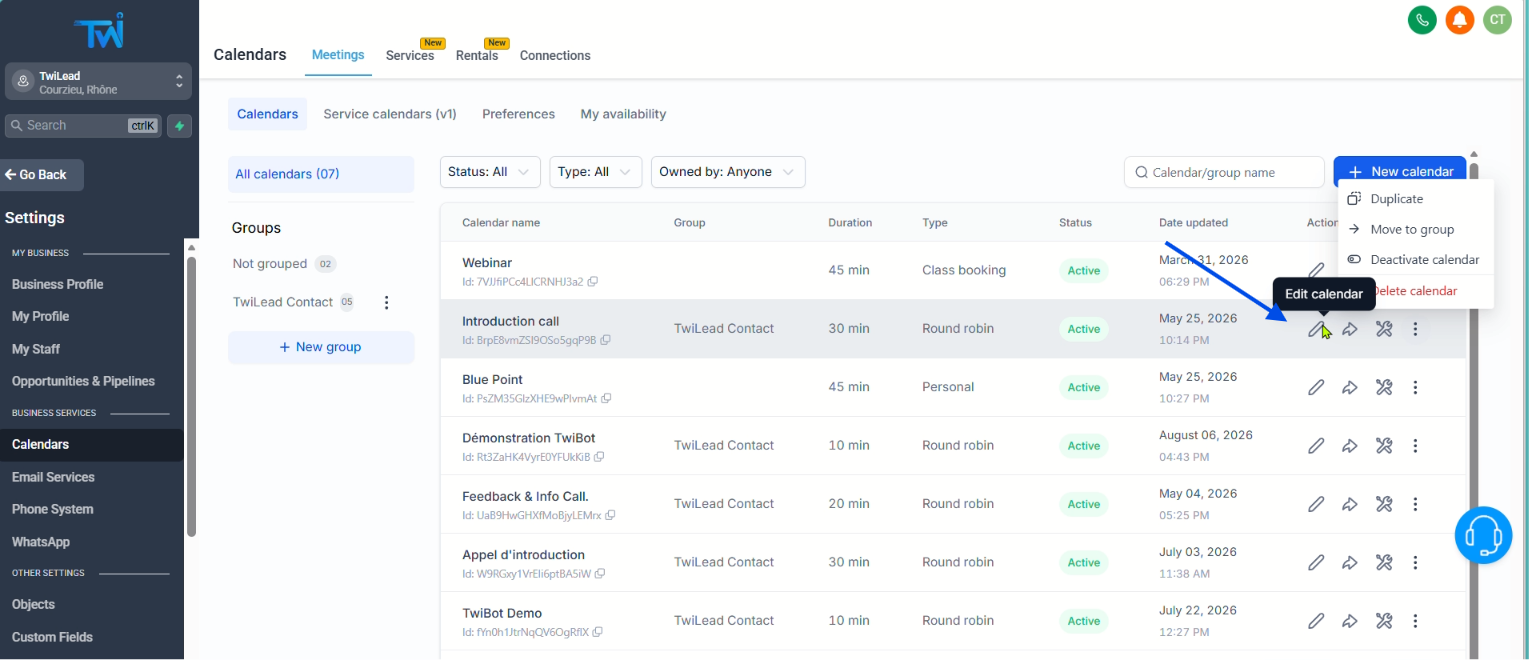
Then click the “Edit Calendar” button (the small pencil)
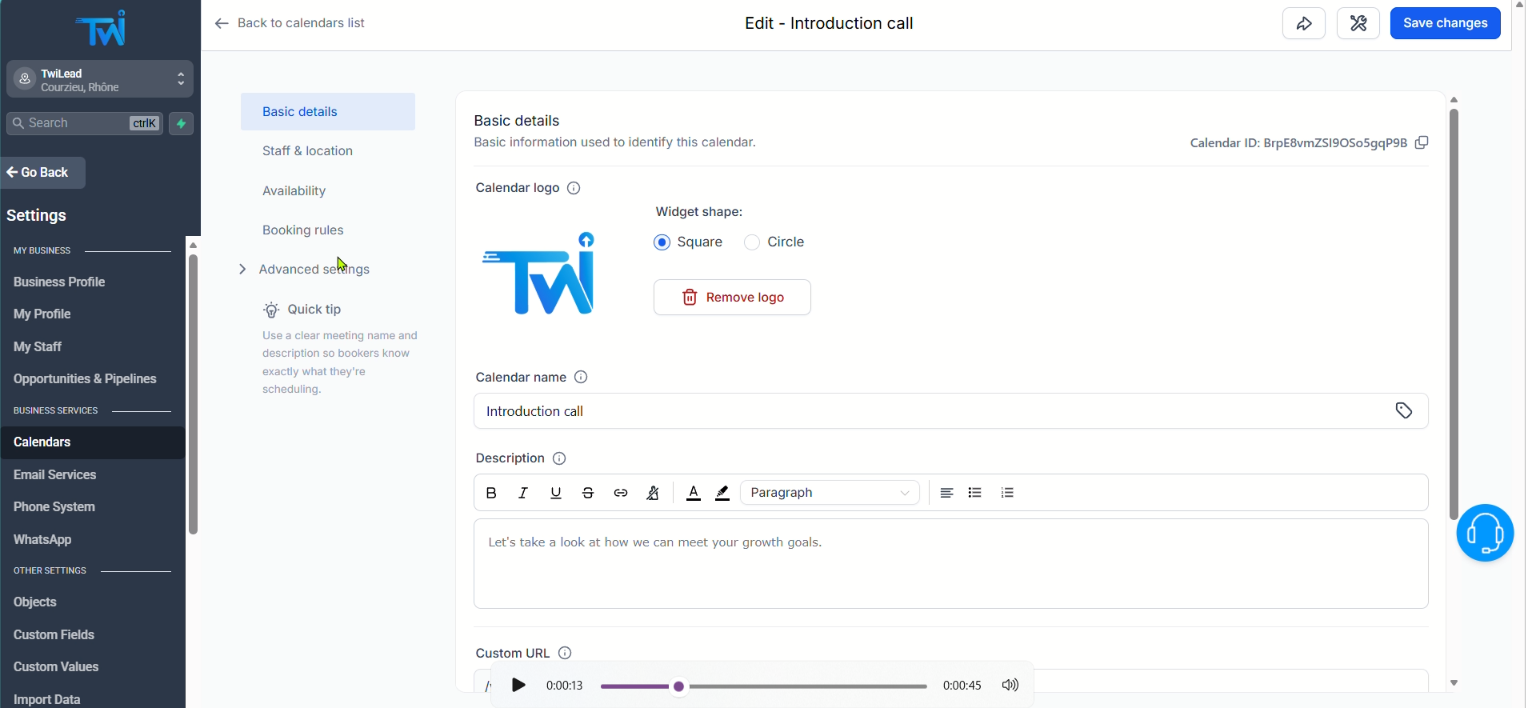
Go to Advanced Settings
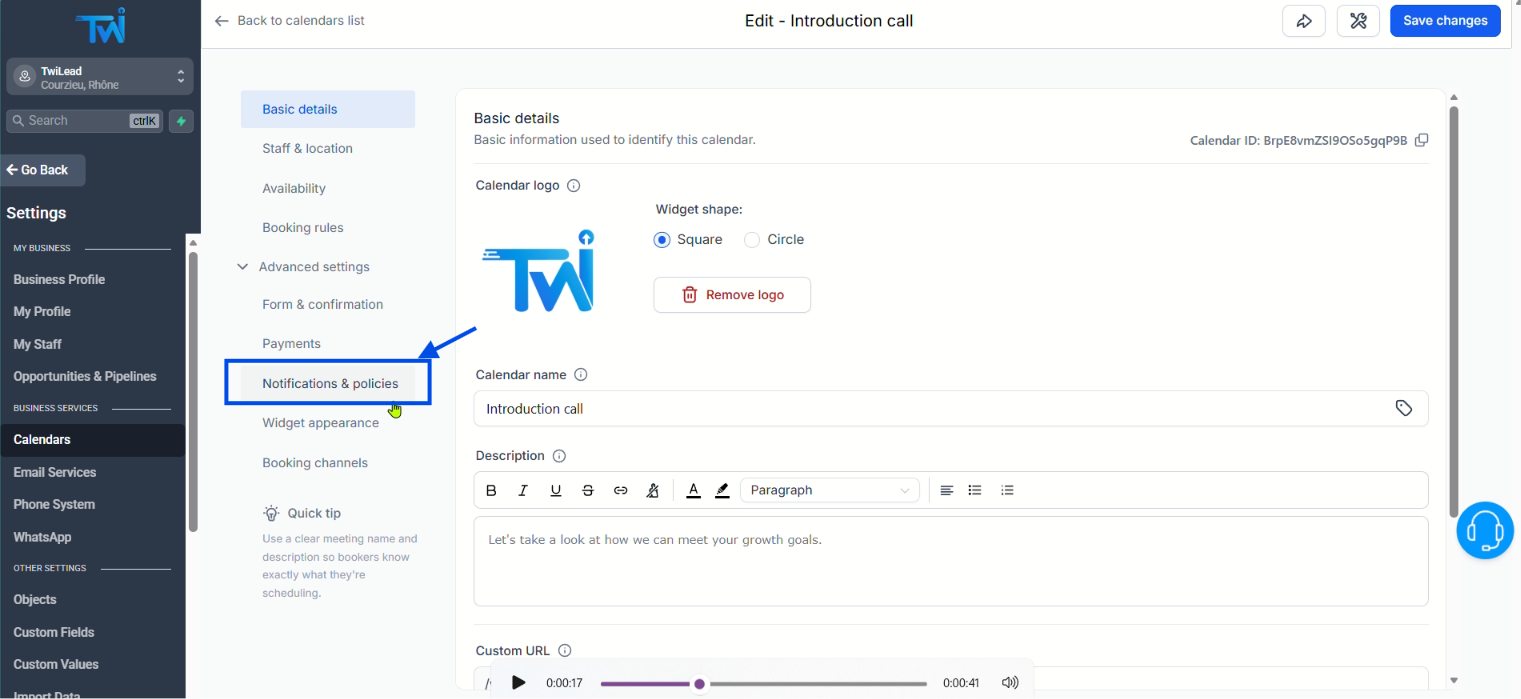
Click on “Notifications & policies” in the left menu. This is where you’ll configure all your reminder and confirmation messages.
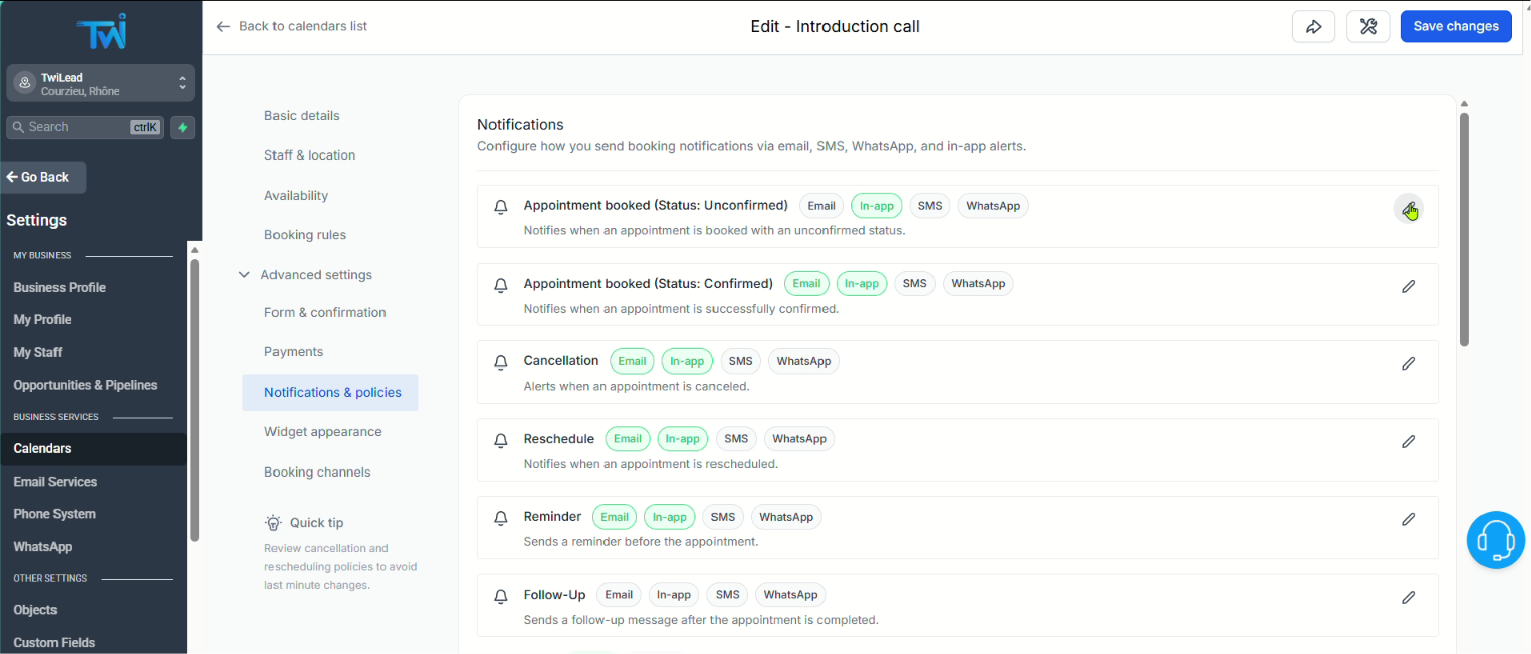
You will find all the prebuilt automations available, from appointment scheduled to follow-ups. To autosend confirmations choose “Appointment booked“. This option will send a message to notify an appointment has bing booked.
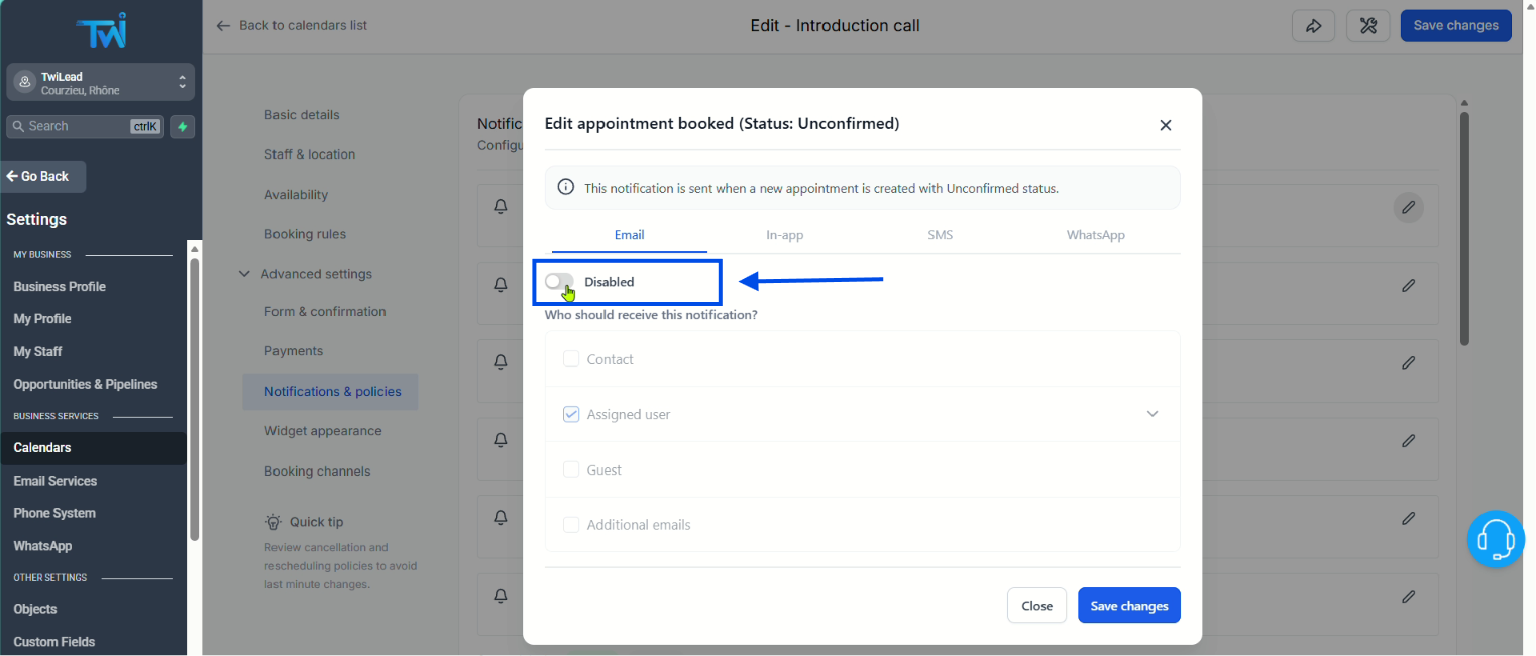
Some options are disabled by default, click the button to activate it.
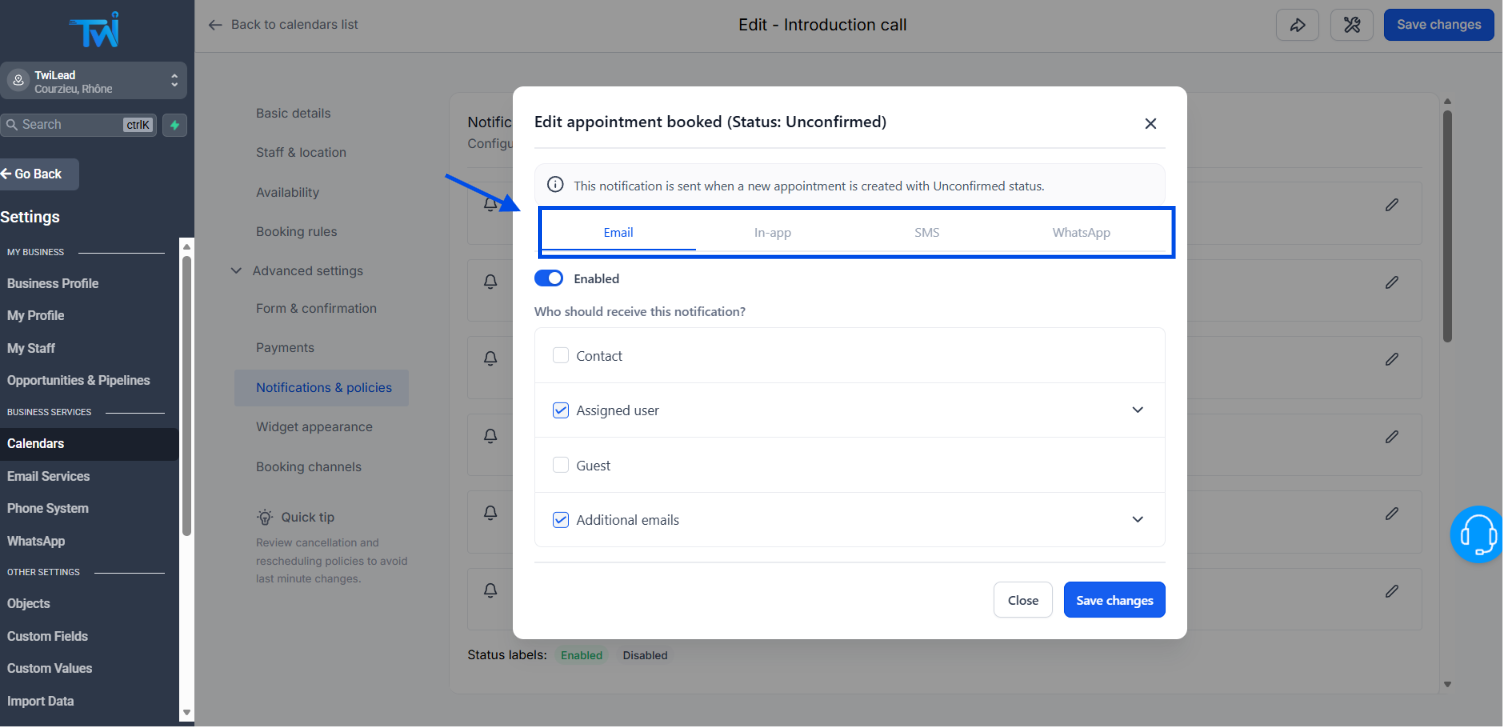
You also can choose to send the notification via email, in-app, trough SMS or via WhatsApp. Sure, you can choose all the options simoultanesly
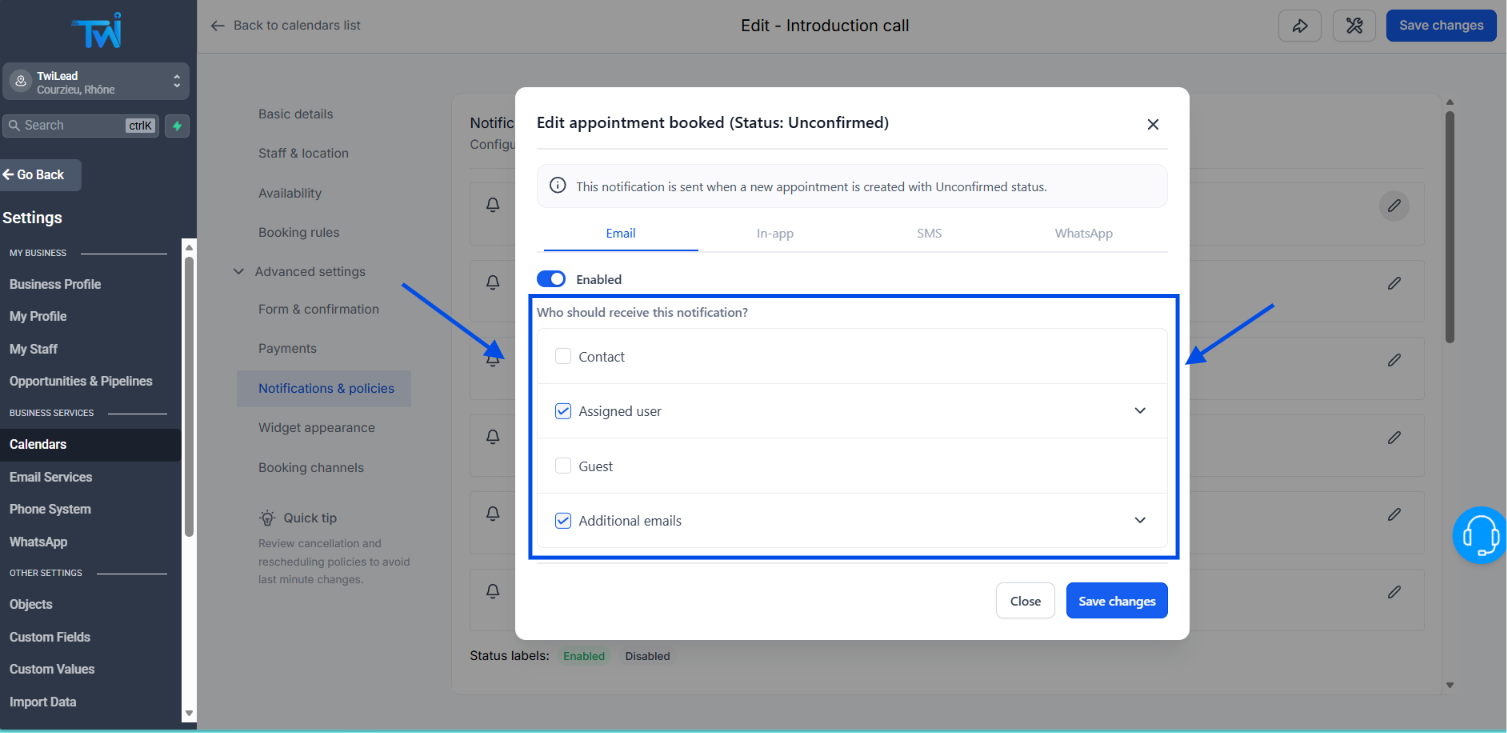
Choose those who are going to receive the notification.
Contact: The person who booked.
Guest: Any other person invited to join the call
Assigned User: The concerned team(s) member(s)
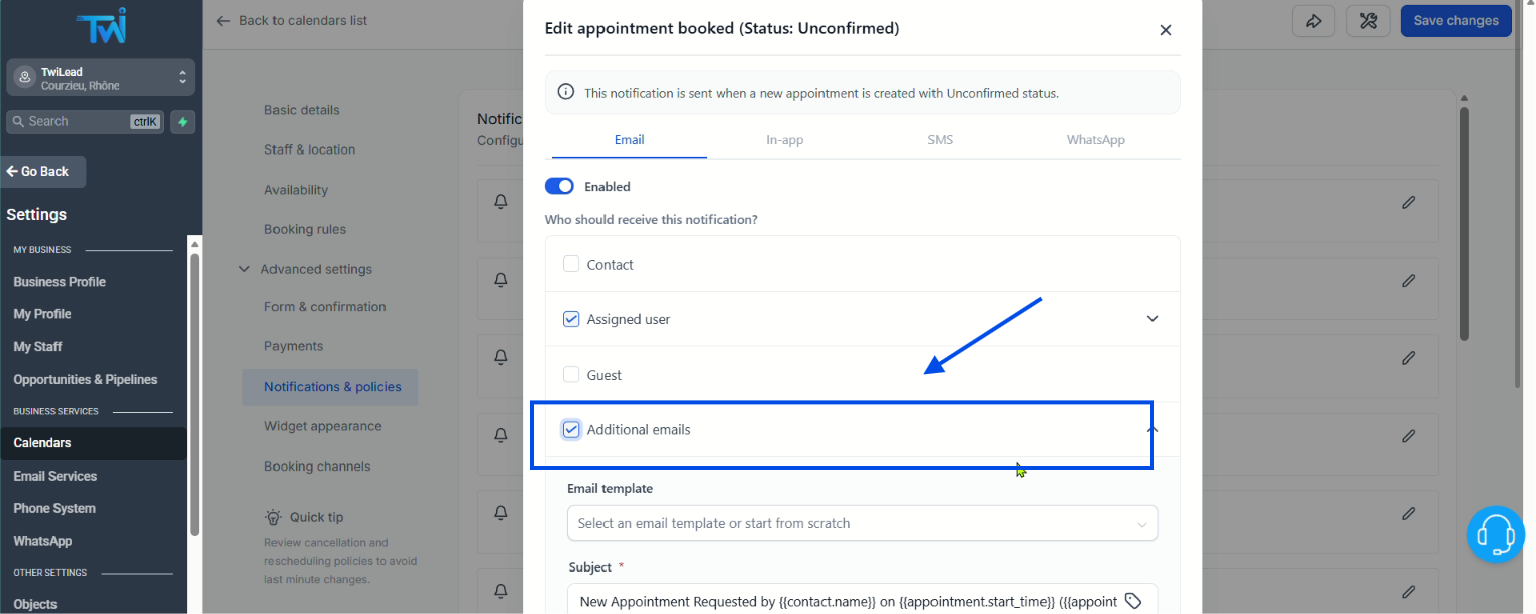
By default, TwiLead will send one message, you can add more messages clicking on “Additional emails”
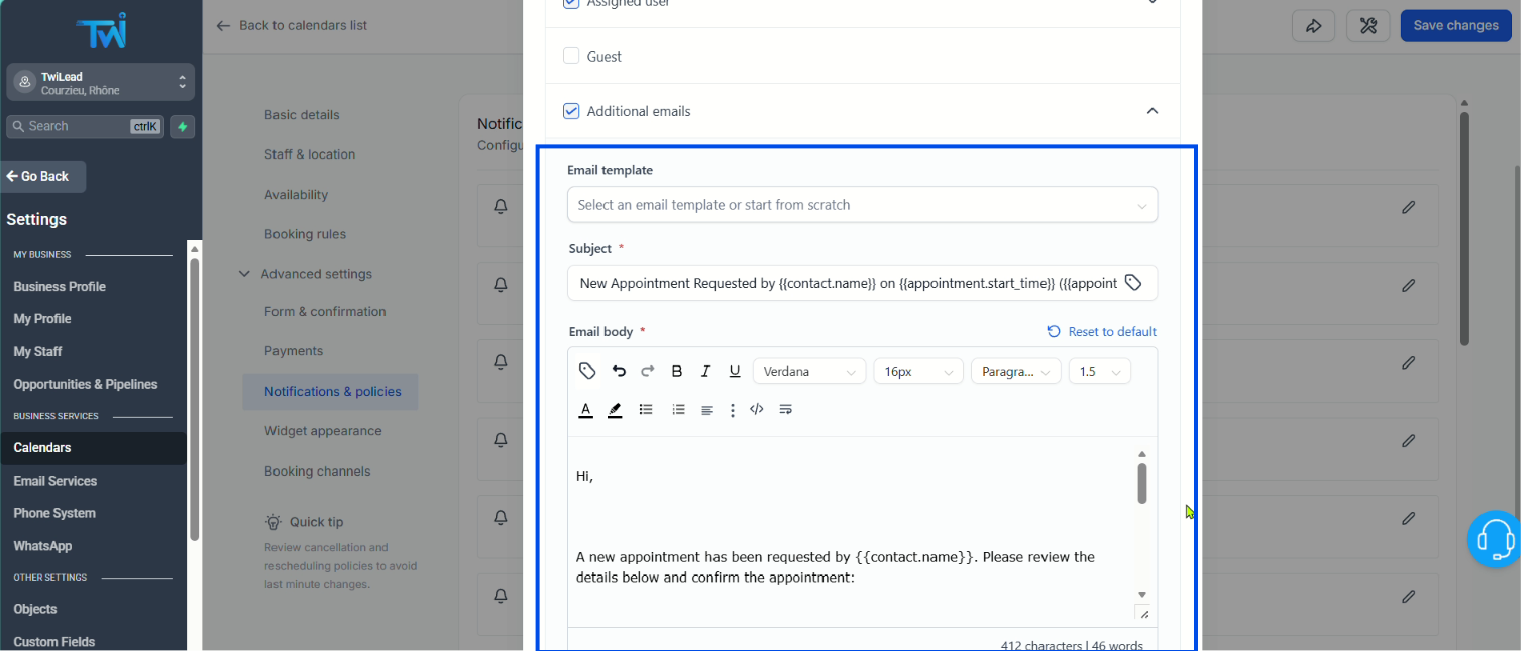
Customize your message as you wish.
Auto-send reminder sequences
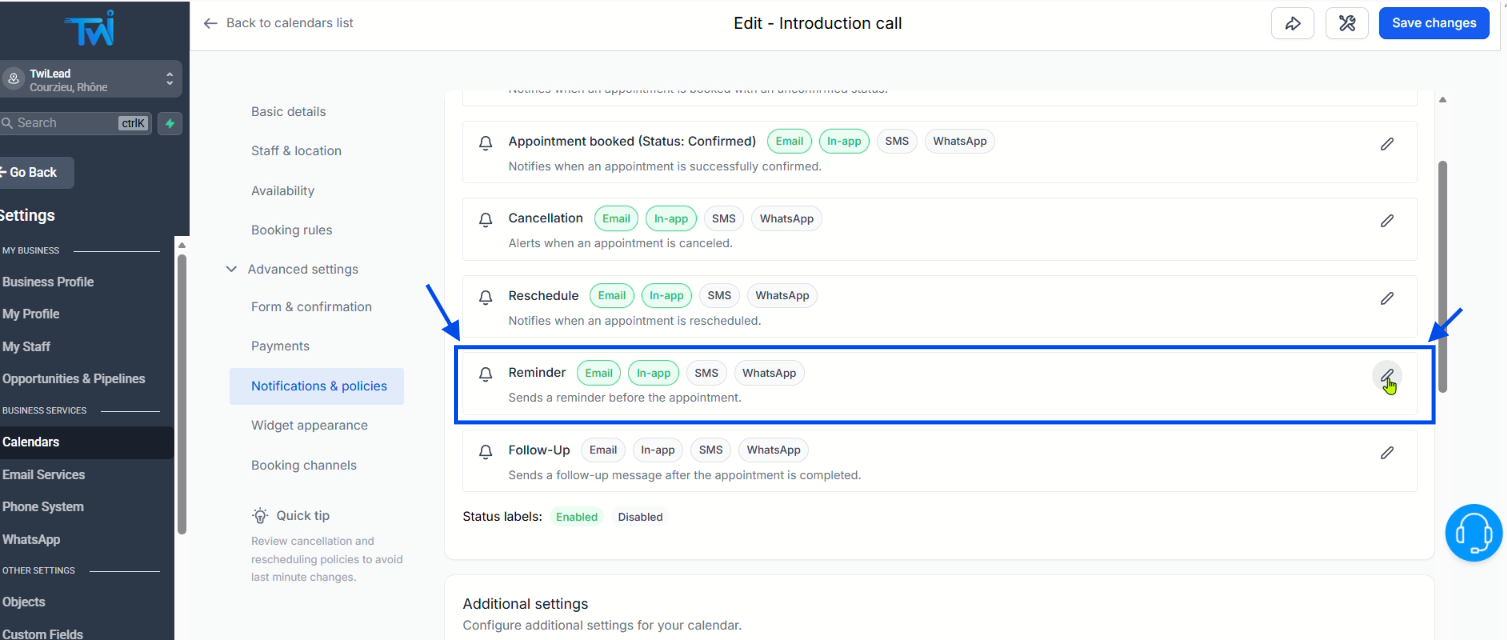
To reduce no show-ups it is important to send not one, but multiple reminder notifications. Go to “Reminder” section.
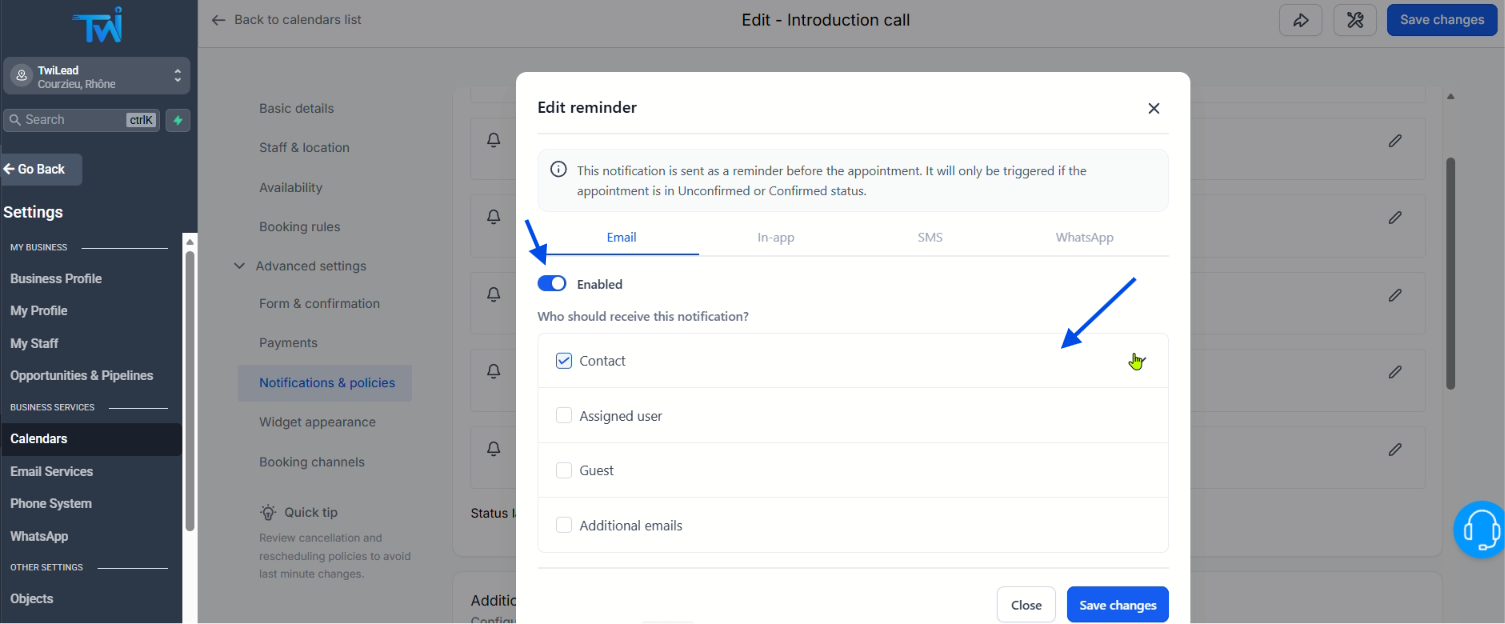
Enable the option, and choose “Contact” to be sure the customer is going to receive the message.
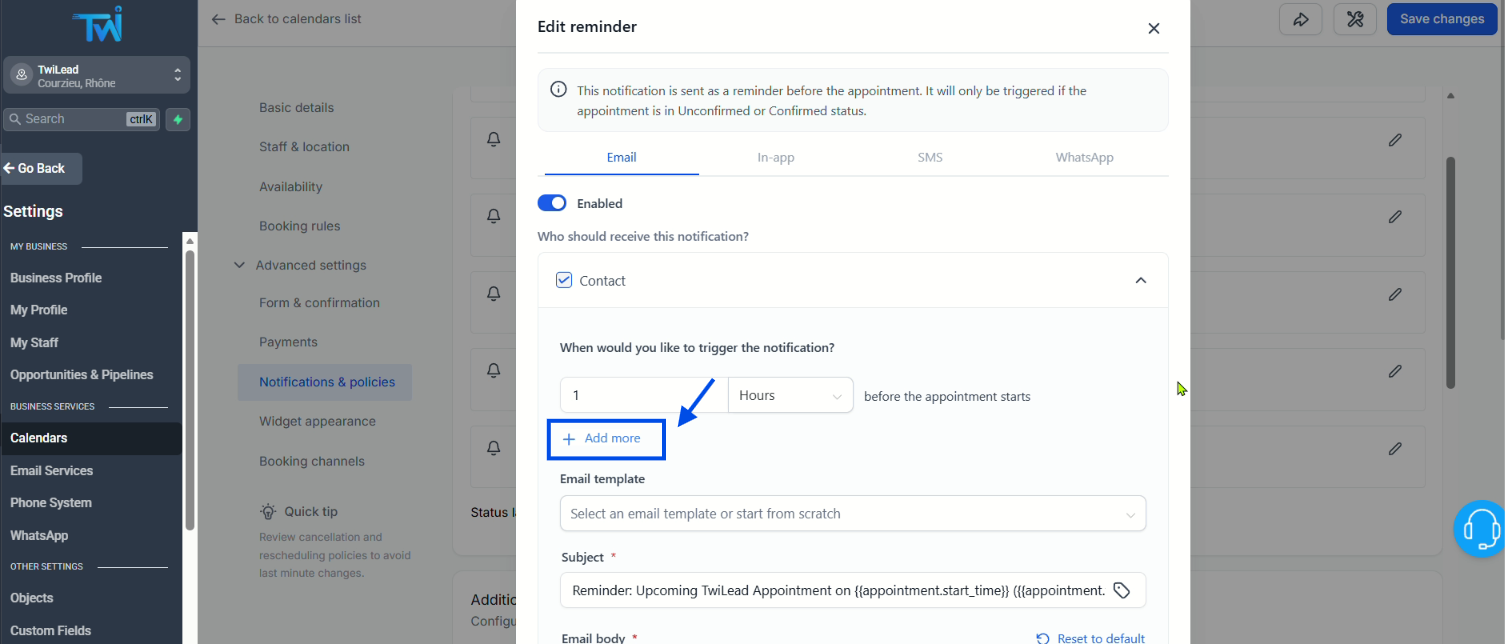
By default the reminder notification is sent 1 hour before the appointment starts, to add more reminders click on “Add More”
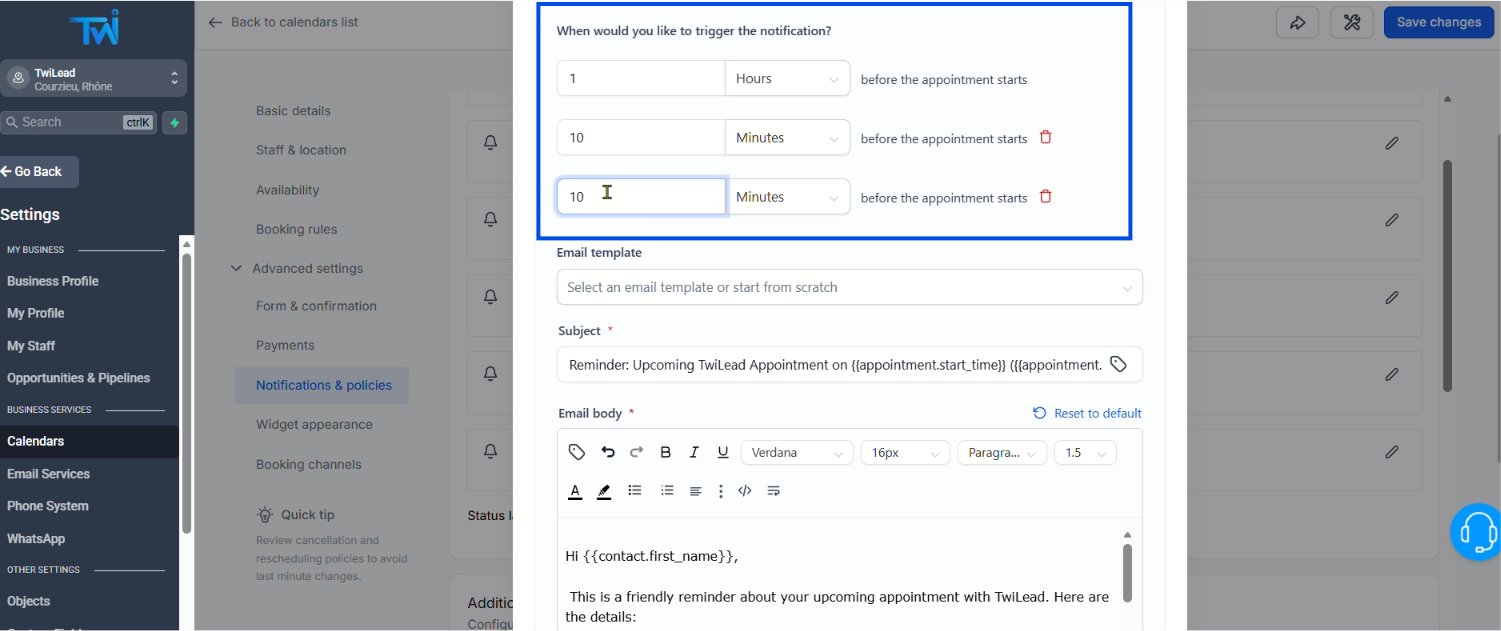
Customize the sequence. And that´s all! Now you have created a reminder sequence as part of your Schedule Automation system.
Handle cancellations automatically
And what if somebody cancels? No problem, TwiLead covers you.
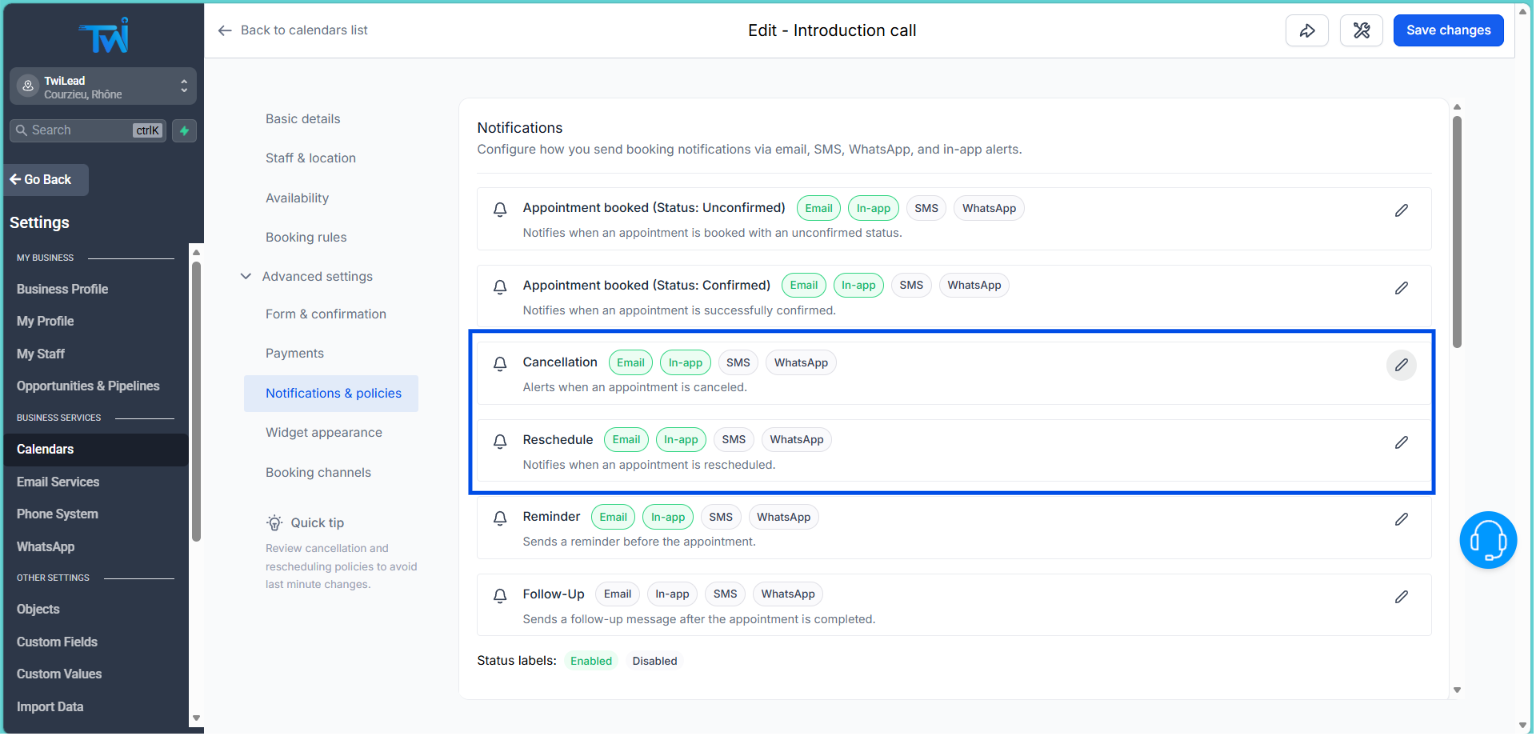
Go to Cancellation to set up notifications after somebody cancels, and to Reschedule to be informed when somebody reschedules.
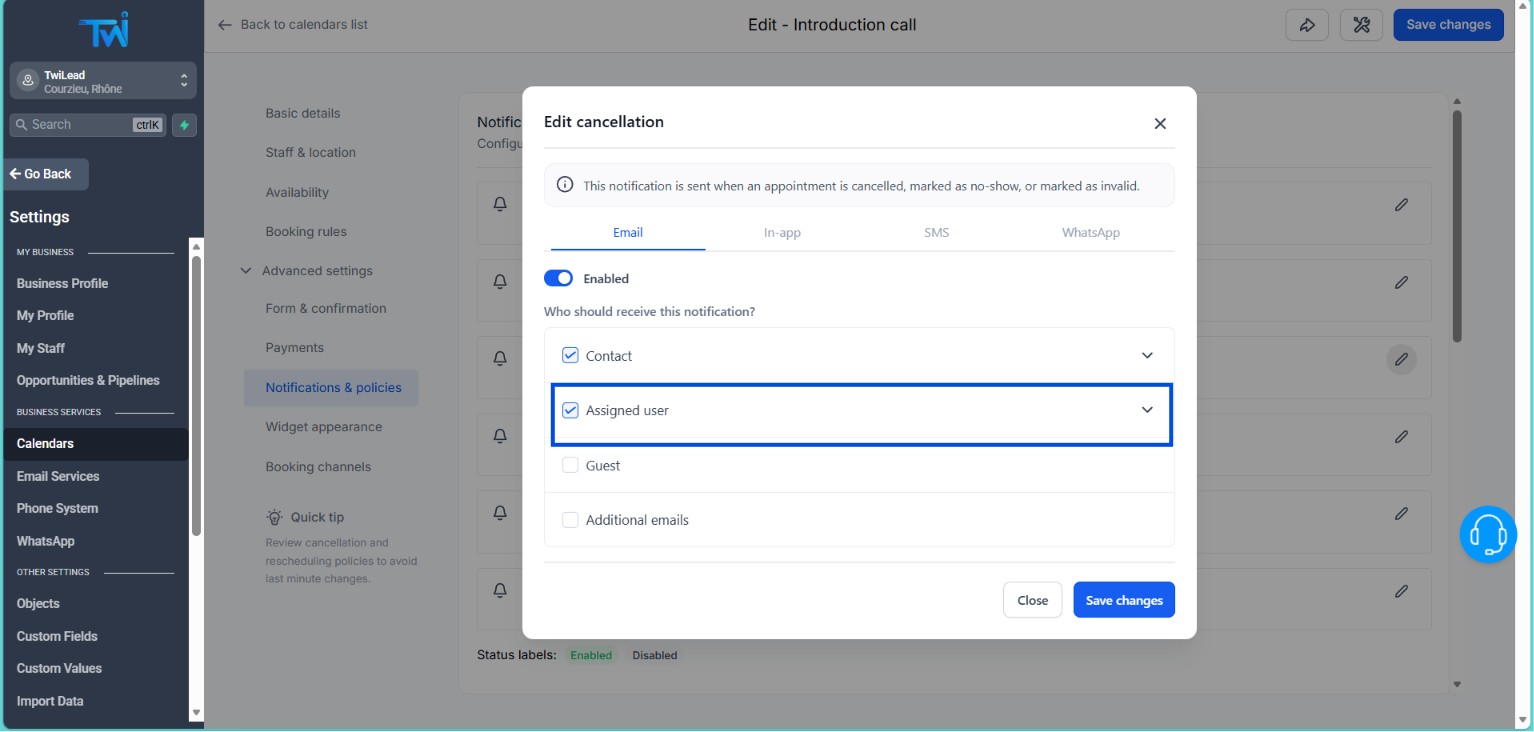
Be sure to choose assigned user and Contact so both, your customer and your team are informed.
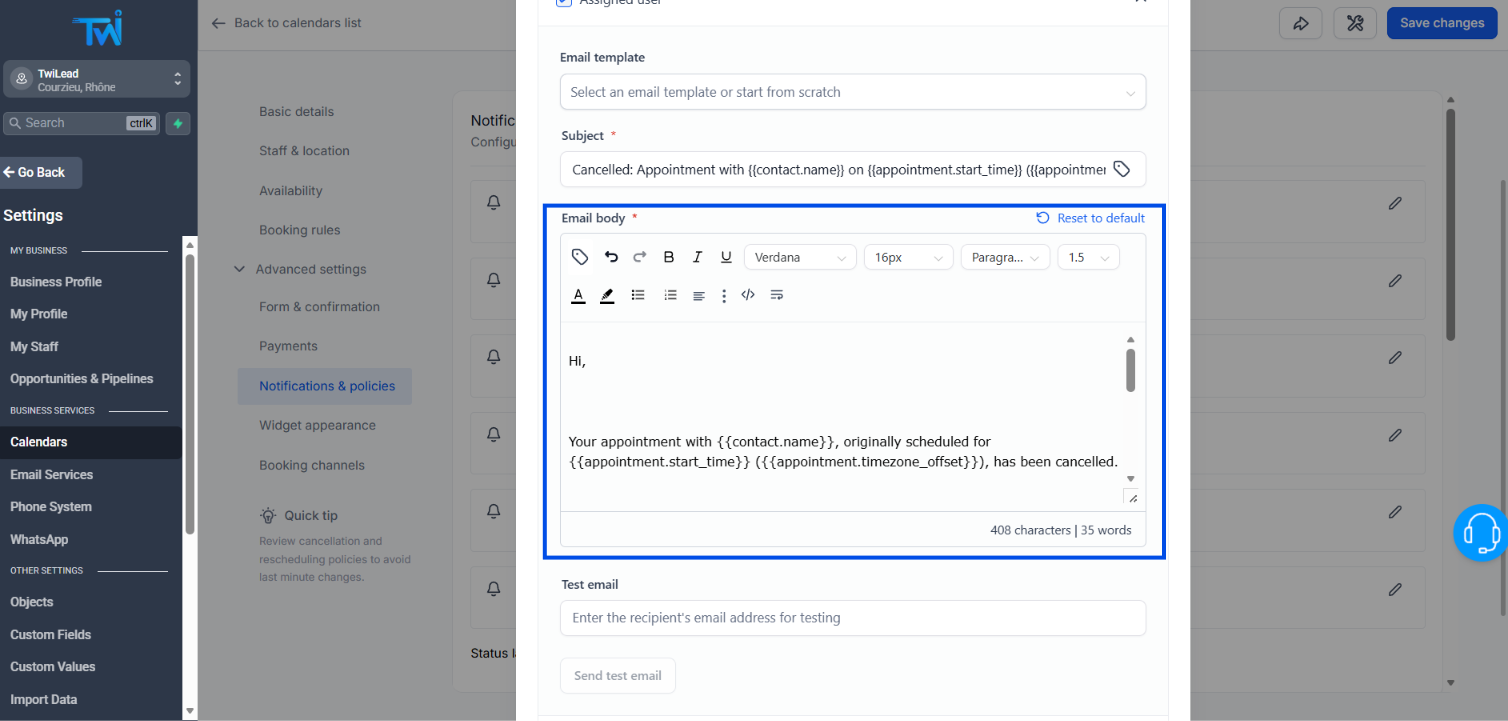
As usual, customize your message if needed
Trigger a Workflow when a booking is made
The moment someone books a slot, TwiLead can automatically kick off a Workflow, no manual step needed on your end. This is the foundation for everything else, since you can create infinite workflows from one single trigger.
Let´s learn how to do it!
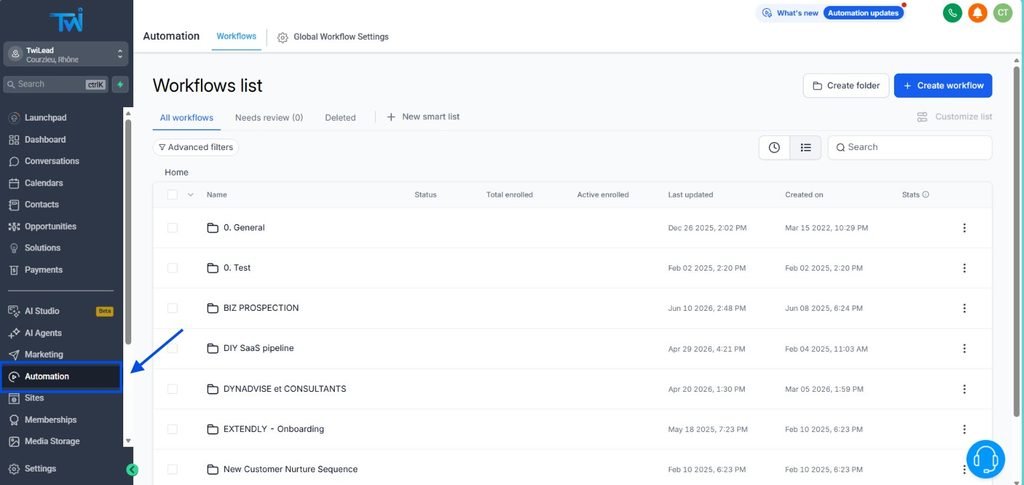
Go to the leftside bar, then click on Automations
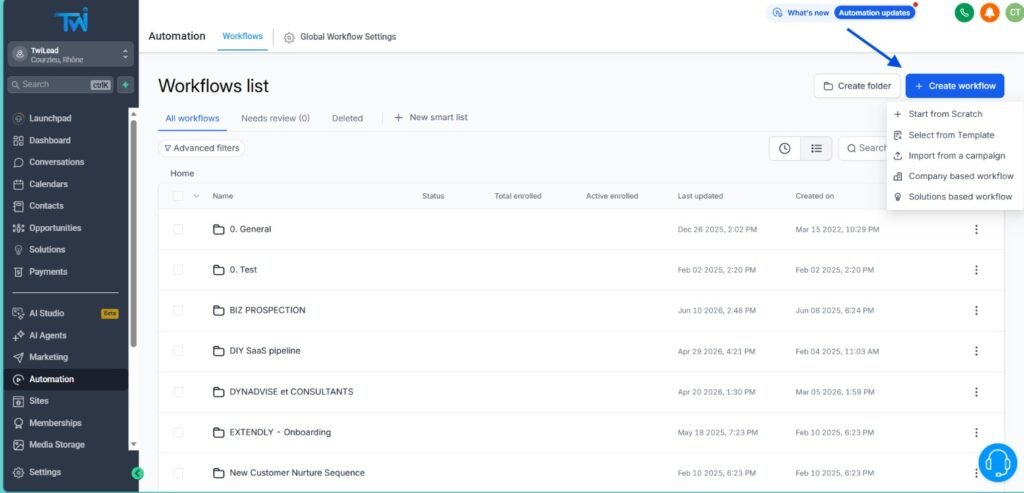
Click on Create Workflow
.
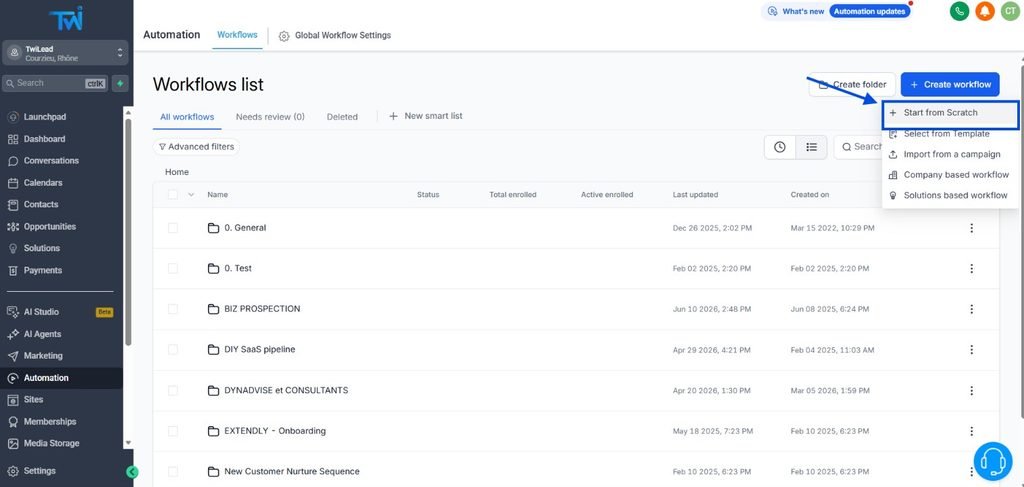
A small menu will appear with different options. You can choose to start from scratch or use a template, among other more advanced options.
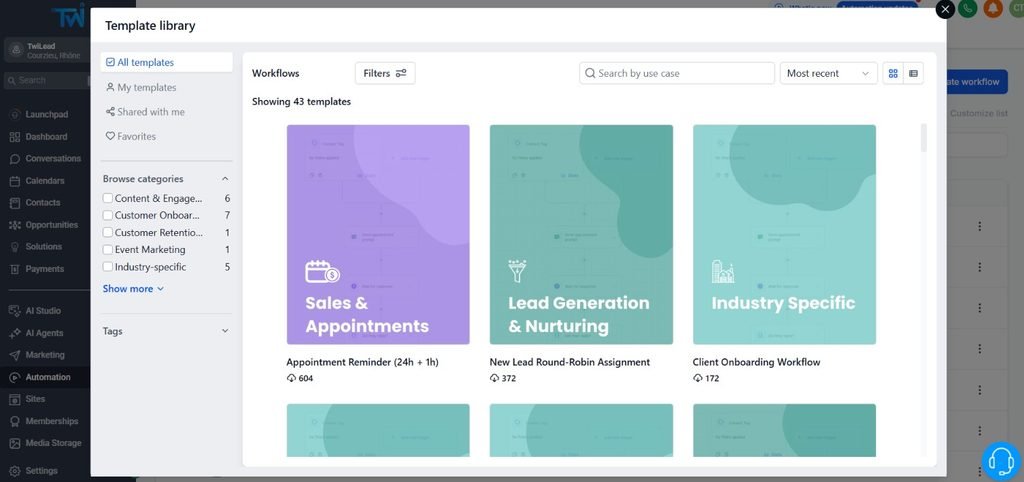
If you prefer start with a template, you will find multiple options of workflows already created by TwiLead team.
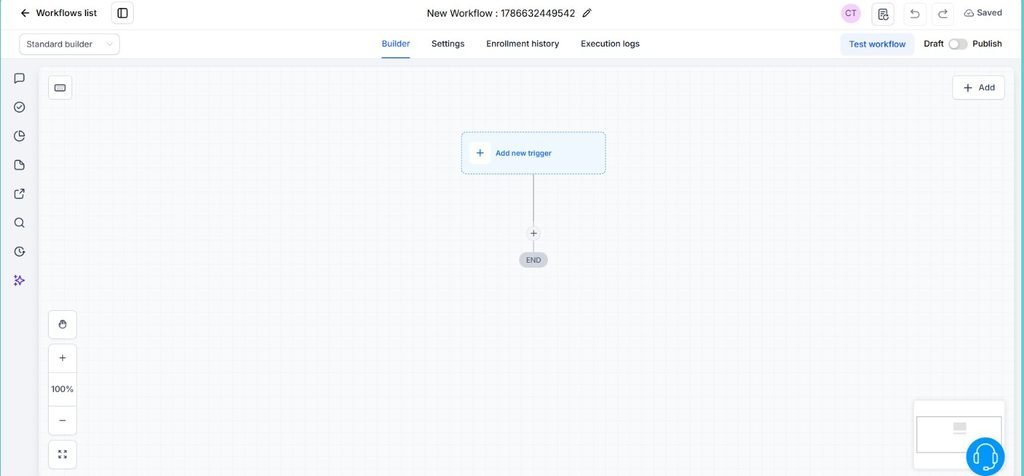
For this tutorial we chose to start from scratch, this is the view you will find.
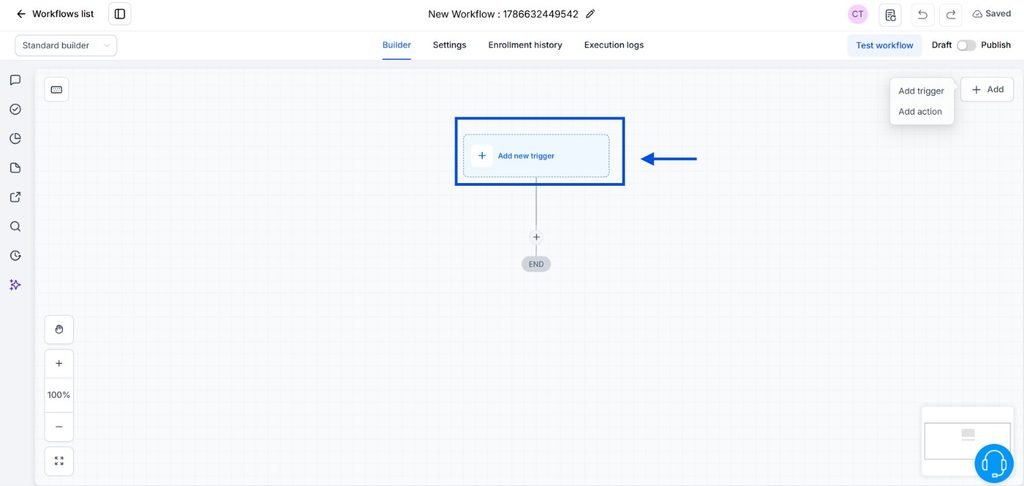
Click on Add New Trigger
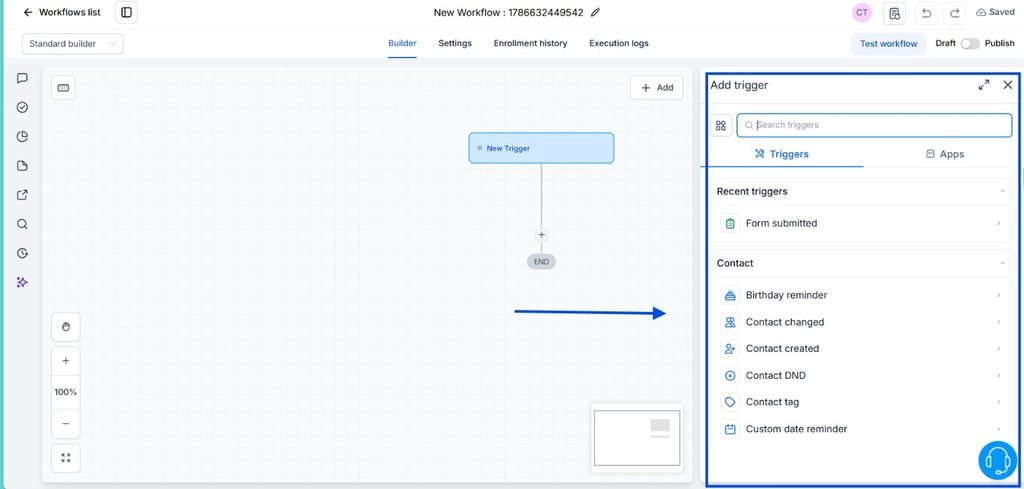
On the right, a menu will display with all the possible trigger options to choose from.
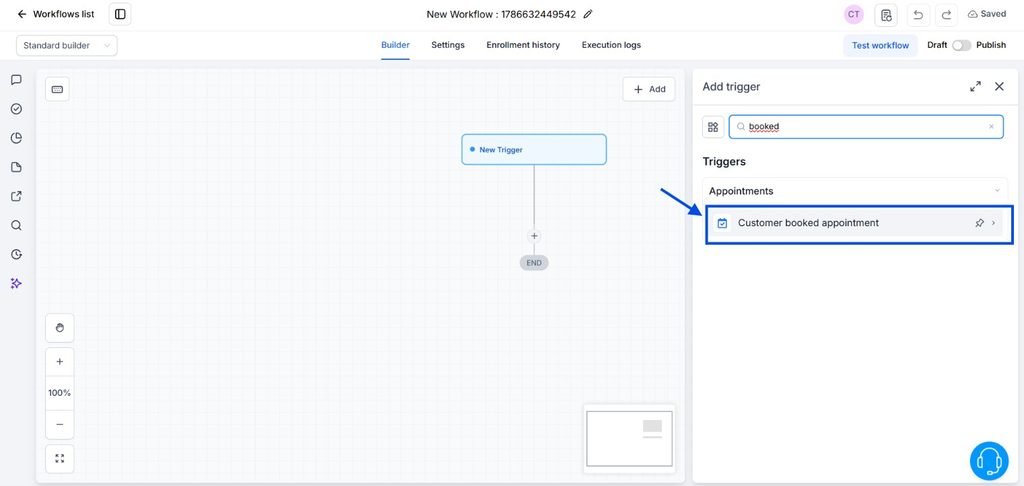
We are going to look for the “Customer booked appointment” option
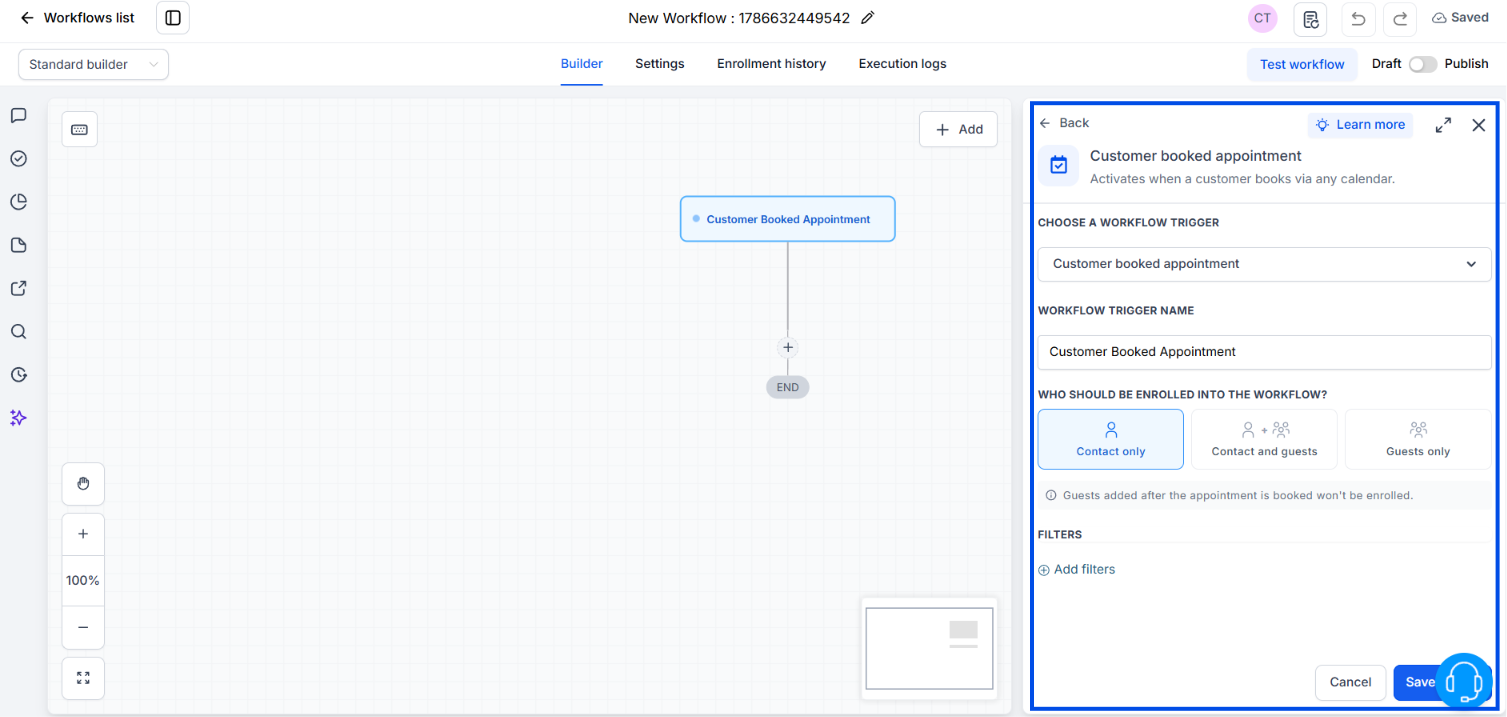
Then choose the person(s) to add into the workflow, if it is a 1:1 session you need to choose the “Contact Only” option.
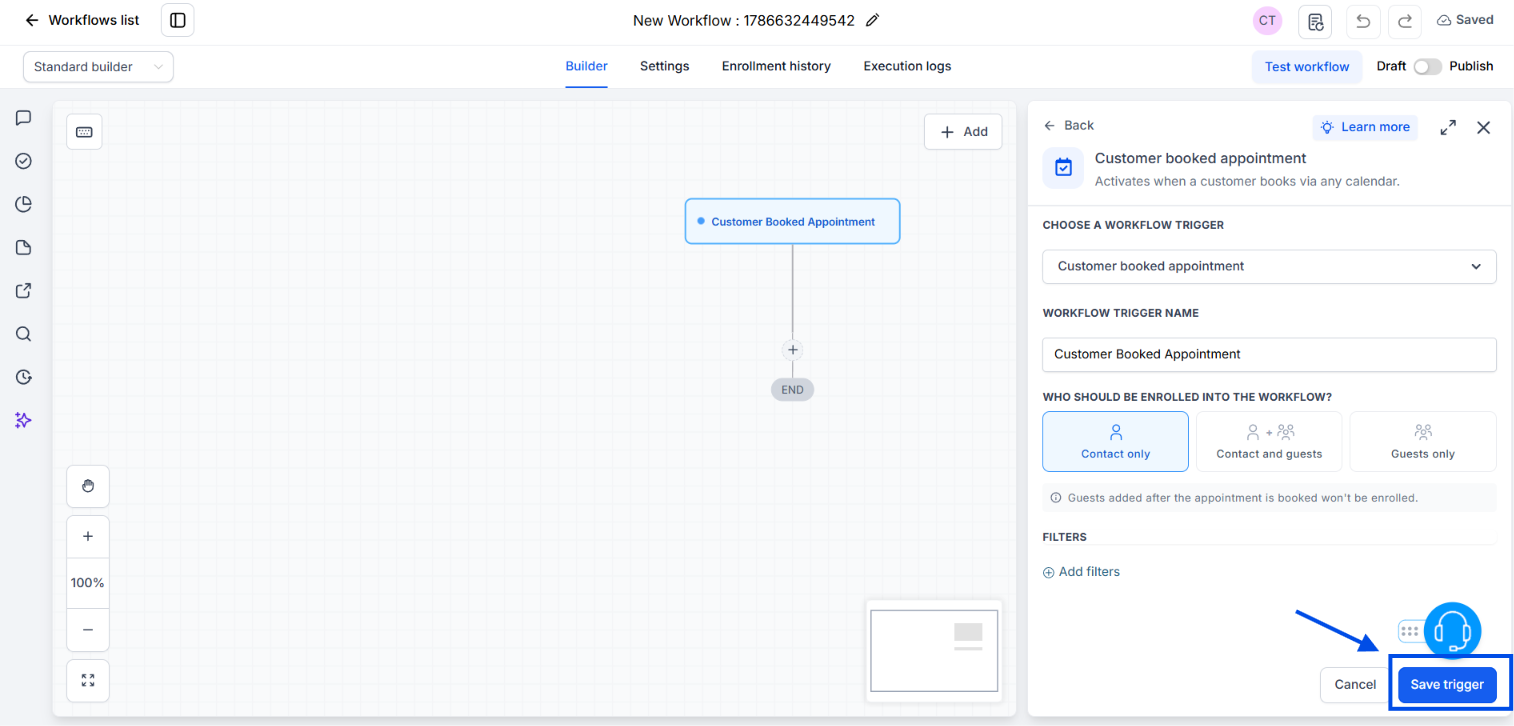
Click on “Save Trigger“
Now your trigger is set, that means any time a person books a call the workflow automation will be activated. What happens next is up to you. You can automate an email sequence, an opportunity creation in a sales pipeline, assign the contact to a member of your team and more. Let´s see some of examples of popular automations.
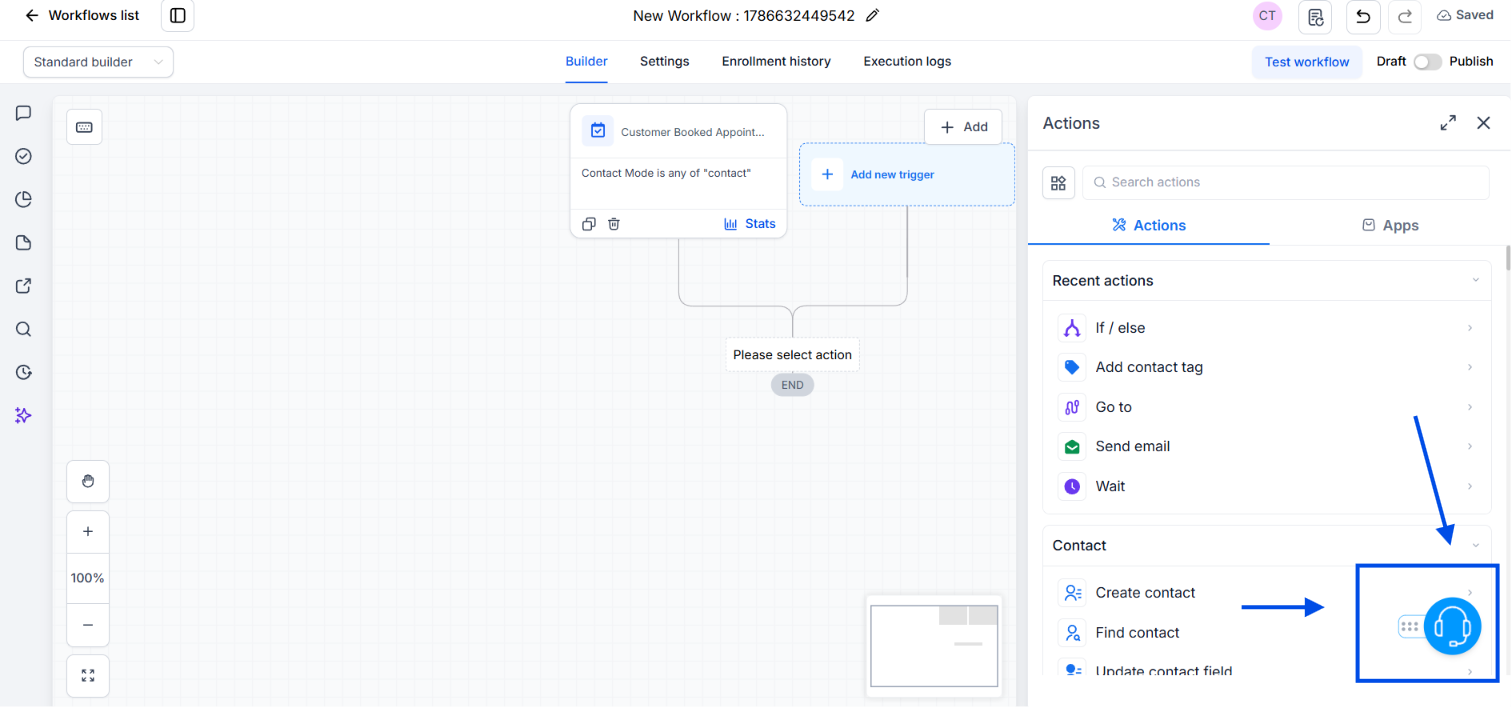
If you need an adavanced automation, you can always contact Customer Service, available 24/7. They would help you with all the process.
Auto-tag or move the contact into a pipeline stage
Auto-tagging or moving a contact into a pipeline stage the moment they book removes the manual work of updating your CRM by hand, and it means your sales team sees a hot lead the second it happens.
It keeps your pipeline accurate in real time, so no interested lead sits unnoticed, and your team always knows exactly who to prioritize and when.
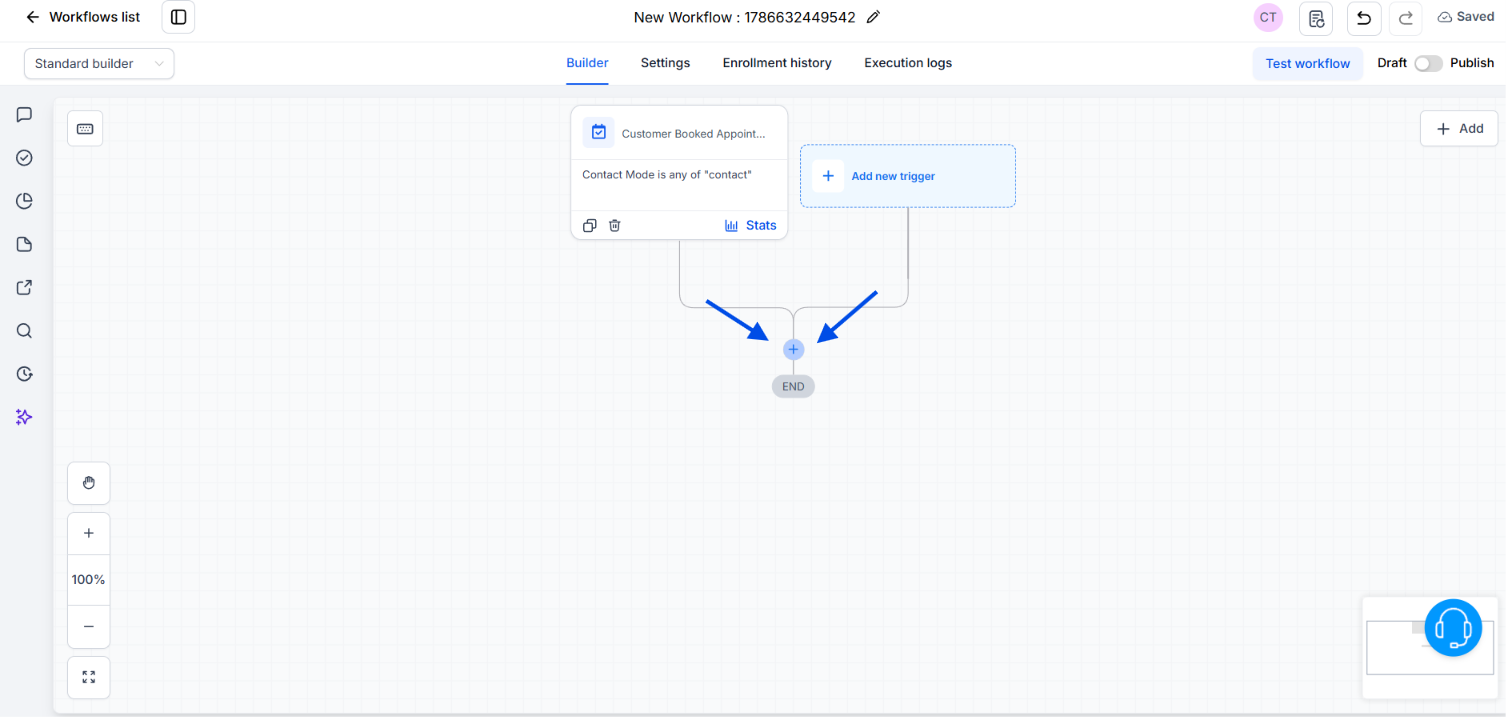
Click on the + symbol to add the new action.
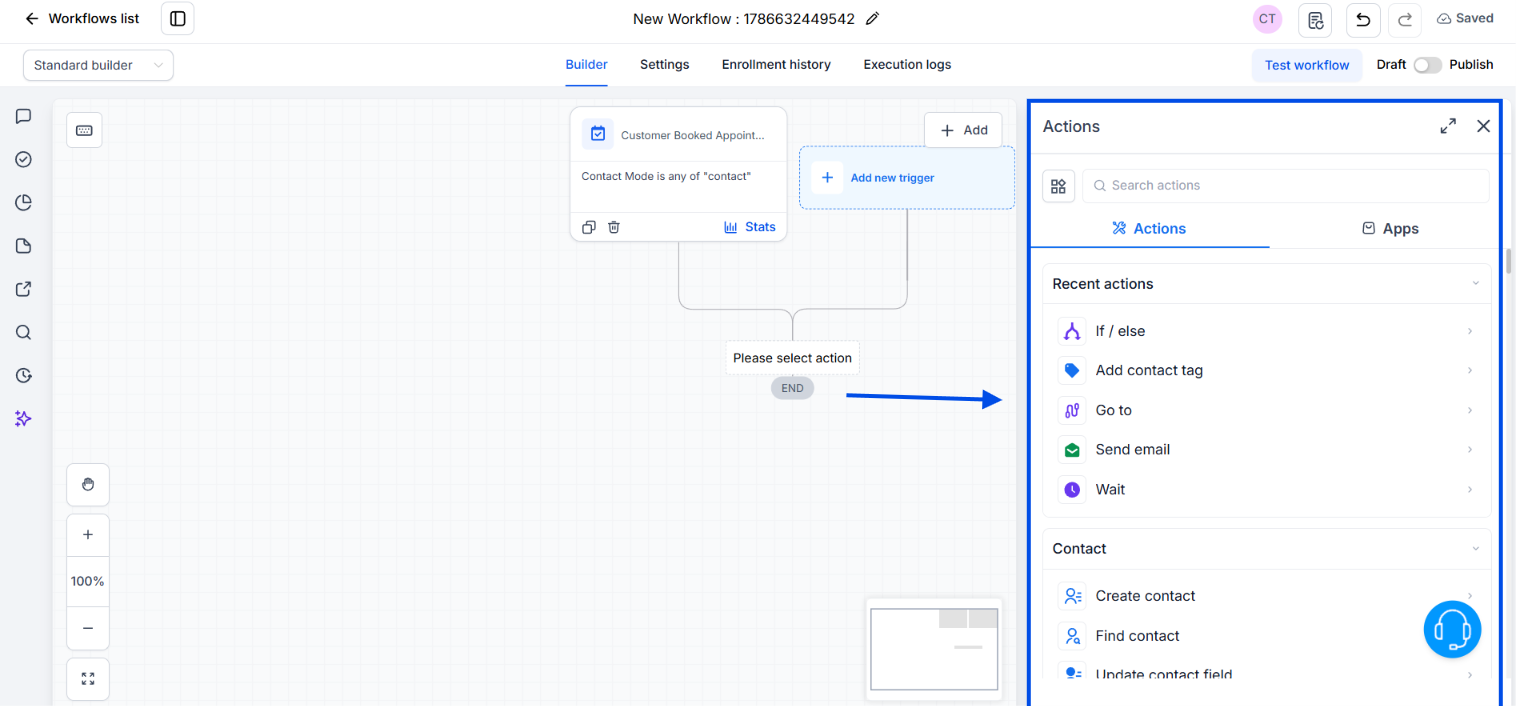
Again, a menu will appear showing all the options you can add.
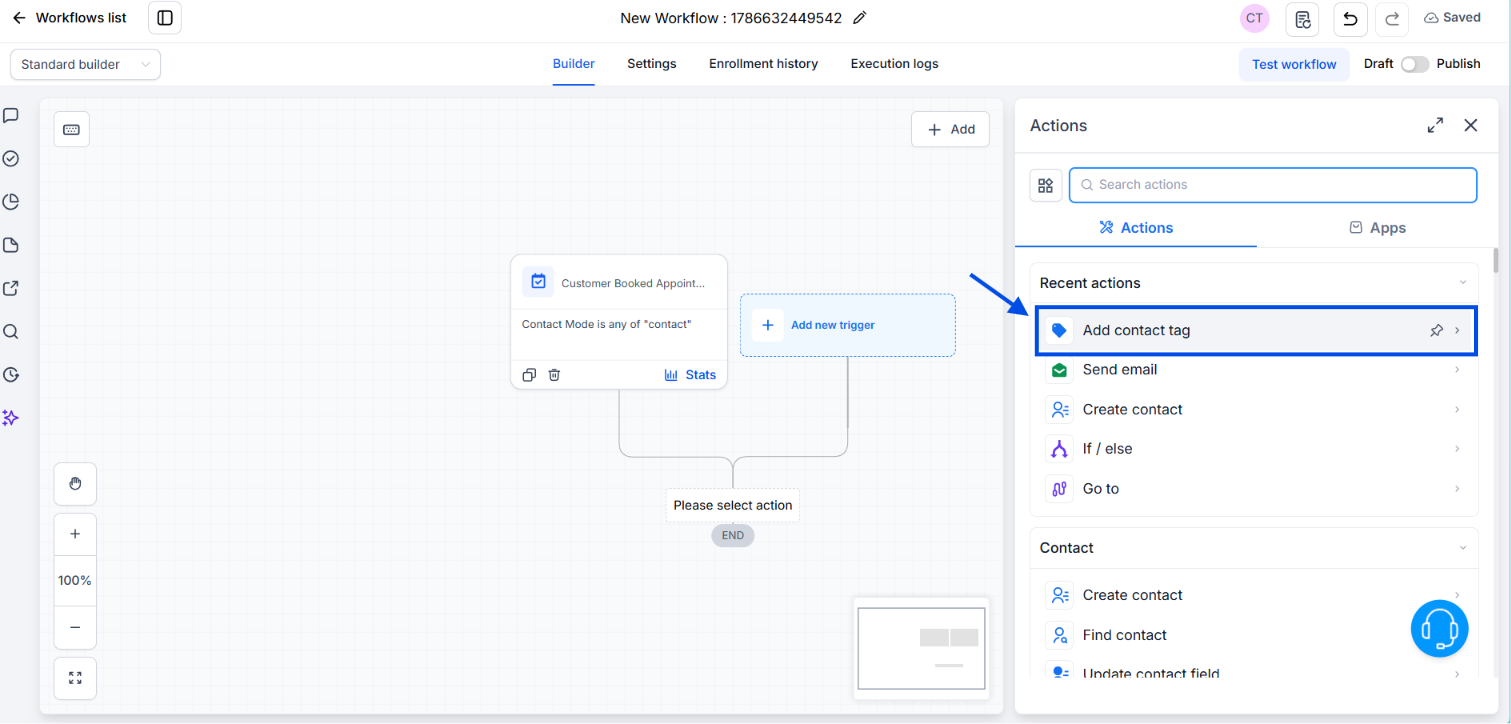
Choose Add Contact Tag
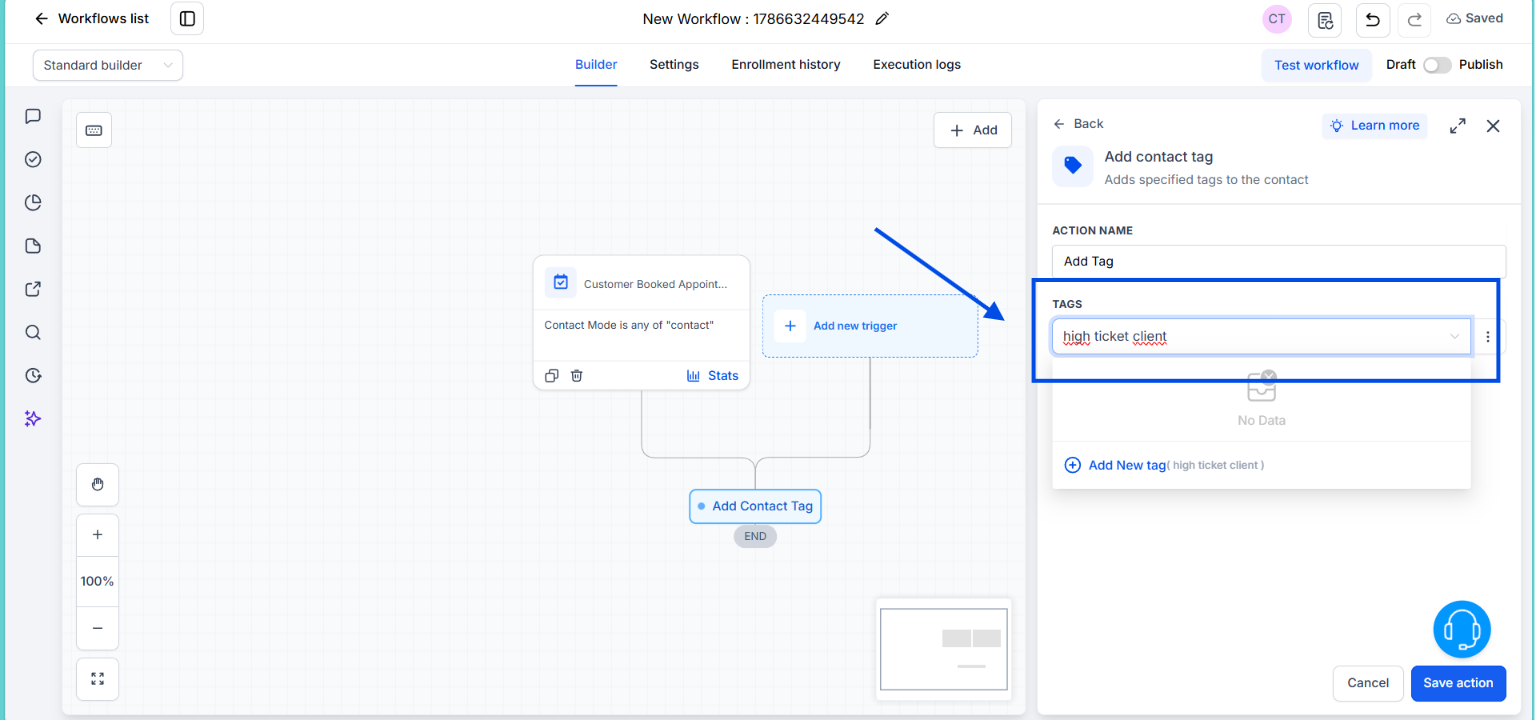
Create a tag name
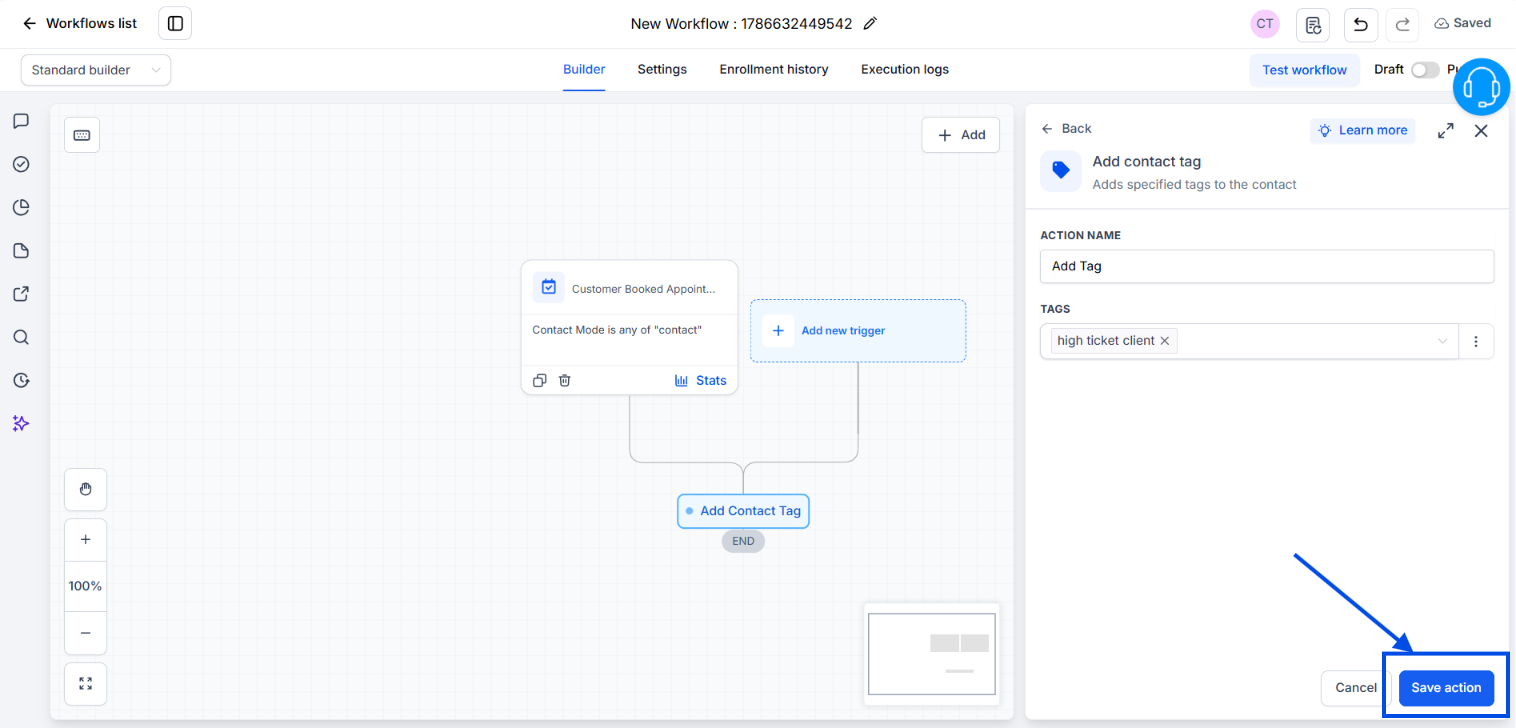
Click on Save Action. And it´s done! Your lead now have a tag that makes easier its identification in your CRM.
Using tags is very usefull to filter your contacts in your CRM, to trigger other actions and so on. Keep in mind the goal of this is to keep focused on your hottests leads and avoid loosing them.
When you are dealing with few ones, it’s okay to have them in your mind. But this does not work anymore when your business grow and you start getting dozens of leads. You need to structure and get organized, otherwise you will loose sales.
Assign the Contact to a Pipeline
As seen just before, a lead booked an appointment and you were able to add a tag on this contact. This is a first small step to organize your sales. Now what happens next? Did the contact show during the appointment? Is he interested in your proposal? Does he need to be contacted again in few days? ….
This is the goal of the sales pipeline : to organize your sales process step by step and follow up your leads. Why ? To know exactly were each leads is : at which stage/step, so you can take adequate action.
Again, don’t think it’s overkilled for you. It’s a matter of efficiency and organization that will guarantee you to be able to deal with more leads without more efforts.
And naturally the more it is automatized, the better it is.
So let see an example. Your contact booked an appointment, great! Now you have to follow it in a pipeline.
You can automatically add each contact that books a call to a pipeline (called Opportunities at TwiLead), assigned to a team member and more.
Let see an example:
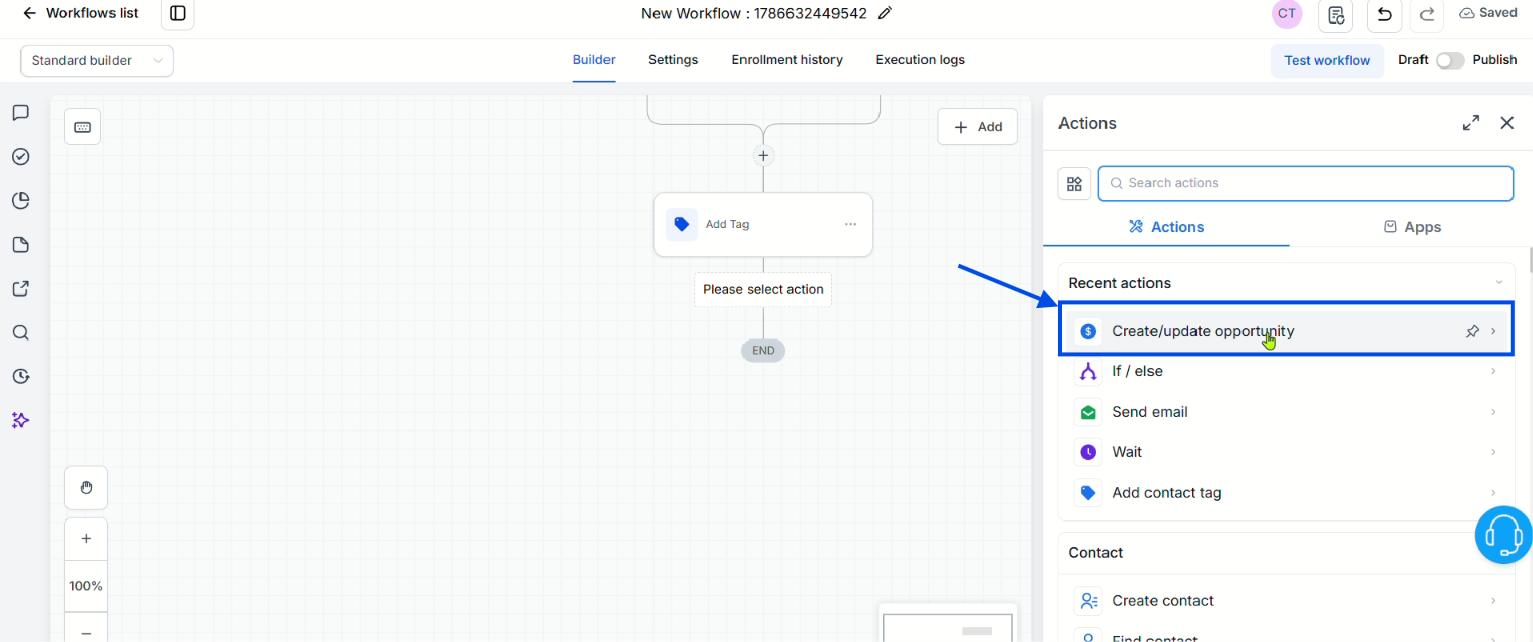
Choose “Create/Update Opportunity”
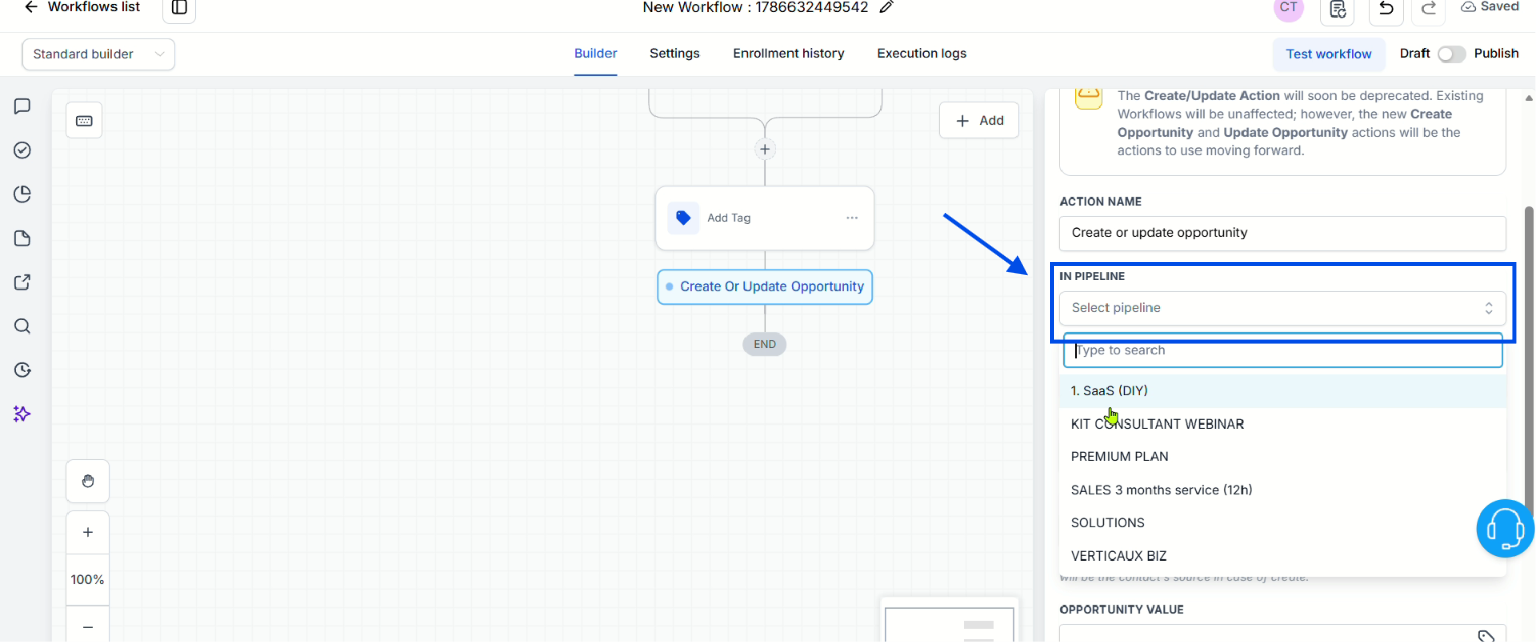
Choose a Pipeline. Note: Before this step you should have already created a pipeline. Learn how to do it in this article.
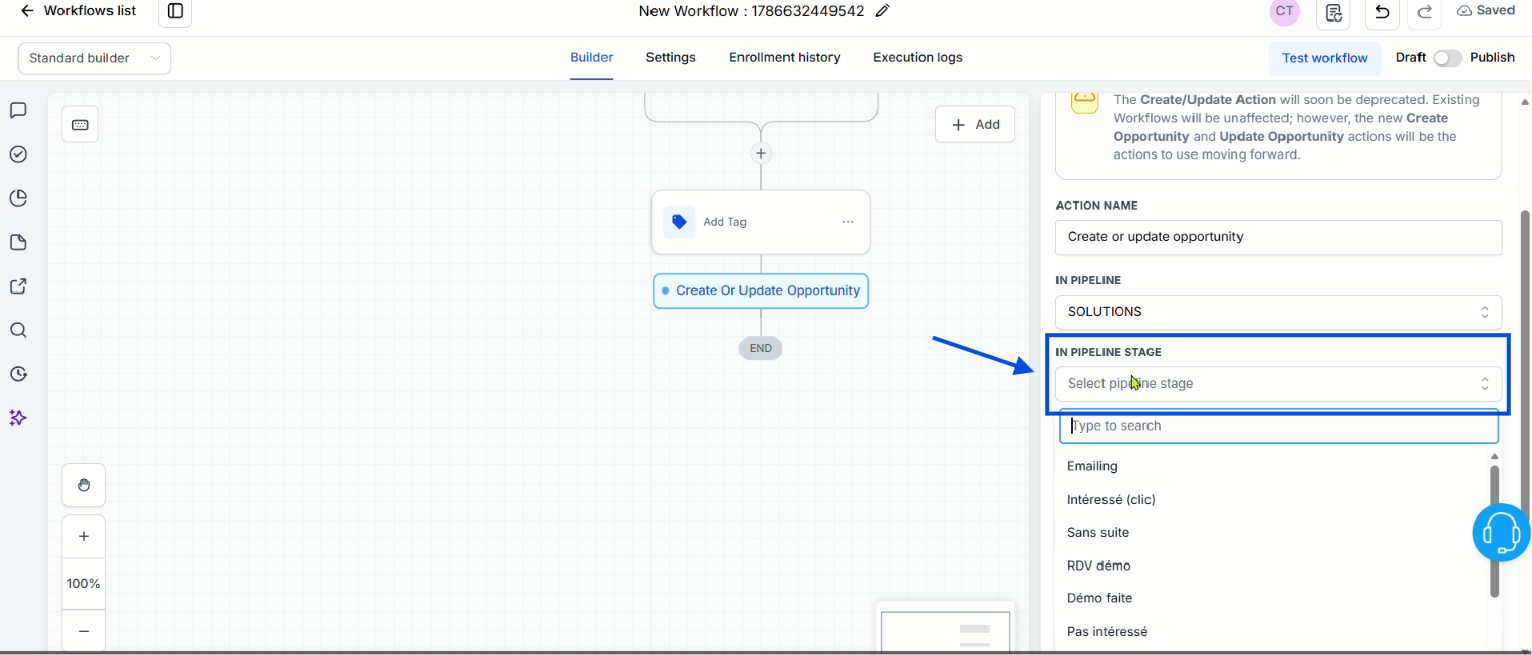
Choose the pipeline stage
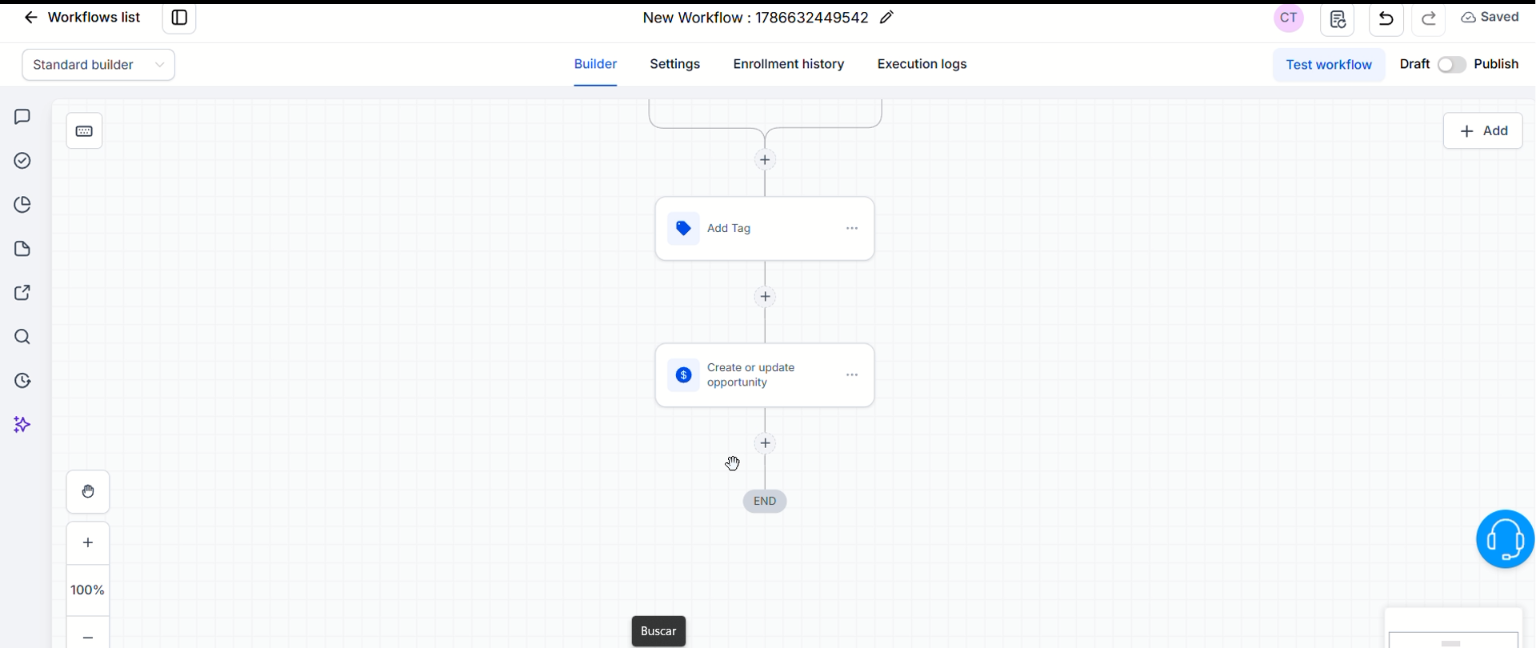
And that´s all! Now each new lead that books a call will added automatically to a pipeline and you know without effort what lead to follow up.
Assign contact to user
That could be useful if you have a team, to assign a preferred member to the contact. This way each member of your team knows what contact they have to nurture first.
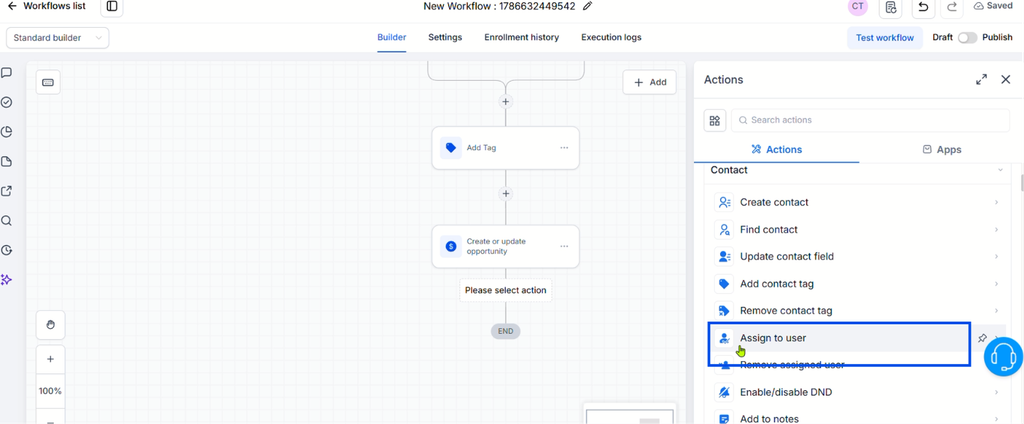
If you want to assign the Contact automatically to a team member, click again on “+” icon, then search the “Assign to User” option
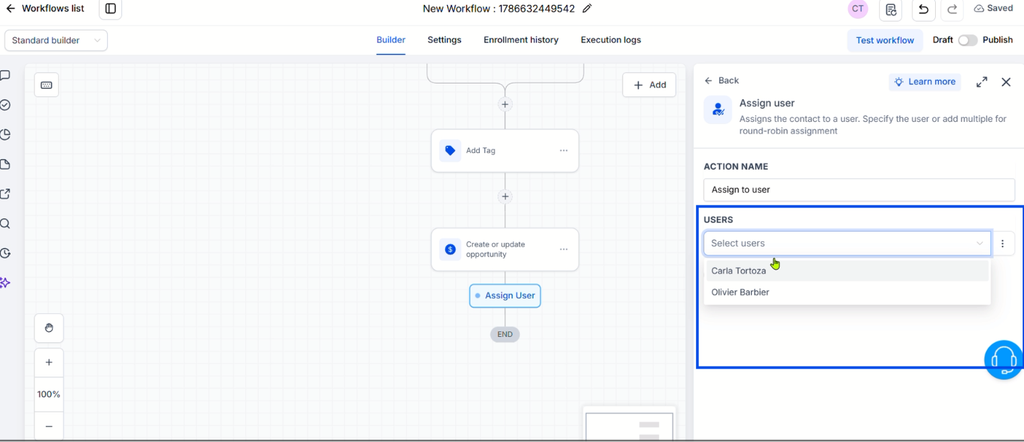
Type the name of the user(s) you want to add, Save Action. And you are done!
How to measure if your scheduling automation is working
Setting up the system is only half the job, if you never check whether it’s actually working, you’re just guessing. The good news is TwiLead gives you everything you need to know, right in your dashboard.
Where to check booking analytics
You’ll find all your booking data inside TwiLead’s Dashboard section. No need to pull numbers manually or juggle a separate tool, everything from bookings to cancellations is tracked automatically the moment it happens.
Key metrics to watch
- Booking rate: how many visitors who saw your calendar actually booked a slot, a low rate usually points to friction in your booking page, not your offer.
- No-show rate: how many people booked but never showed up, this is your first signal that your reminder sequence needs work.
- Reschedule rate: how often people push their booking to a different time, a high rate can mean your availability isn’t matching what your ideal client actually needs.
To see this metrics from your dashboard you will need to customize it, learn how to do it here.
When to adjust your availability rules or reminder timing
If your no-show rate keeps climbing, that’s your clue to add another reminder, or send it closer to the actual call time.
If your booking rate is low despite decent traffic, revisit your availability, maybe your slots don’t line up with when your ideal client is actually free.
And if reschedules are frequent, it might be time to widen your buffer time or open up more flexible hours.
Treat these numbers as a monthly check-in, not something you review once and forget, since small adjustments here are what keep your system converting instead of just running.
Common mistakes to avoid
Even the best system can underperform if a few small details slip through the cracks. These are the mistakes we see most often, easy to fix once you know to look for them, but costly if they go unnoticed.
No buffer time between bookings
Back-to-back bookings look efficient on paper, but in reality they leave you scrambling, no time to prep for the next call, or to add any extra information about the call made. Be an strategical profesional and always add buffer time between slots,
Forgetting time zone settings
This one’s sneaky, everything looks fine on your end, until someone shows up an hour early or late because their time zone was never accounted for. Double-check that your calendar automatically adjusts to each visitor’s local time, this is exactly the confusion schedule automation by TwiLead can eliminate.
No reminder sequence, leading to high no-show rates
A confirmation email isn’t enough on its own, people forget, life gets busy, and without a reminder, that slot you fought to book goes to waste. Set up a reminder sequence leading up to the call, it’s one of the simplest ways to protect your calendar from empty slots
It’s easy to assume everything works because it looks right from your dashboard, but the only way to know for sure is to book a slot yourself, as if you were the client. Check the confirmation email, the reminder, the time zone display, catching a broken step before a real prospect does saves you a lead you can’t afford to lose.
Ready to create your first schedule automation today?
Manual scheduling was never just a small inconvenience, it was quietly costing you time, deals, and money you didn’t even see slipping away.
Now you know how to fix it, from defining what you’re scheduling for, to setting real availability rules, to automating everything that happens after someone books, confirmations, reminders, pipeline stages, even no-shows.
Implement all the steps and you will get a full system working for you around the clock. Set up your first automated calendar for free with TwiLead, you’ll have access to all the features during your 14 day free trial without restrictions.
Let your calendar do the work while you focus on the calls that actually matter.
Want to know how you could improve your business?
Our team is available for a free consultation.